Hey everyone here I will give you all a heads up with the basic setup of a Node js app with SSL certificate. We will be using the OpenSSL for this and along with Express and Nodemon for this app.
You all must be aware or else must have heard about the term “HTTPS”, yes this is something that validates a website whether that is safe or secure to visit. But have you ever wondered what makes it safe and secure ?? Well, here I will guide you through how to make your website more secure and safe. This will just give you an idea of what exactly it is and using this OpenSSL kindly don’t proceed to the production environment.
Before looking deep into the example let’s look into some terminologies so every time we don’t have to Google search something.
- SSL → Secure Socket Layer is a predecessor of TLS (Transport Layer Security), which is nothing more than a cryptographic protocol designed for secured communication over the network.
- HTTPS → Hypertext Transfer Protocol Secure is an application that is an extension or a hybrid version of HTTP, i.e. it is a combination of both “HTTP” and “SSL / TLS” so the birth of a new protocol has been named as HTTPS.
Alright less learning and more implementation guys, let’s now take a deep dive into what we have actually planned to do.
Here is the prerequisite that you will need to use for this,
- Node js Installed
- OpenSSL (Not to worry about this if you’re a Linux and Mac user)
- Node Express Server
- Nodemon
- Git (just for cloning the git repo)
I have implemented this on an AWS EC2 instance ( I have done this on a free tyre EC2 Instance) you can also do the same thing for free of cost.
Well in order to get the certificate, there are just 3 steps to be followed and it is as follows,
- Generate a private key
- Create a CSR (certificate signing request) using the private key
- Generate the SSL certification from CSR.
Yeah, just as simple as it looks.
But how are we going to do it, well open up the terminal guys …
For the best practice, we will create a folder and then put everything inside that folder, for instance once you git clone the project into your Local Machine or else your EC2 instance it should look as shown below,
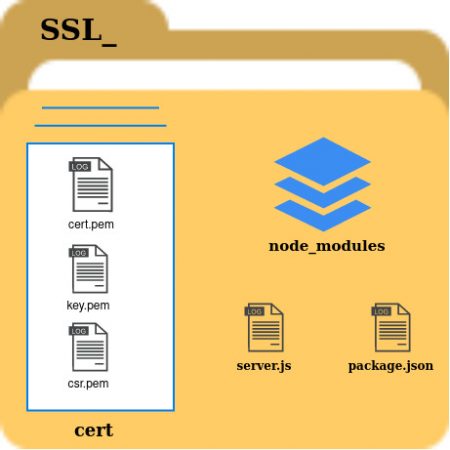
Well I request you all don’t try to use my .pem files and moreover, i have removed all the files inside the cert folder and node_modules it won’t be there since all the dependencies will be removed and we will create from scratch here and you can use this structure as a reference.
If you didn’t clone my git repo then just make the directory as follows,
- ssl_
- ssl_ → cert ( inside ssl_)
Let’s just focus on creating the certificate and key and then move on to node.
Step1:
Move to cert folder and then you need to give the following commands,
Openssl {generate RSA} {output} {output file name with .pem extension}
Code is,
openssl genrsa -out key.pem
Once you give this command, you should see the following output,

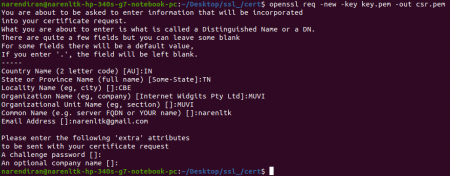
Step 2
Look at the code structure below after step 1,
Openssl {new CSR sign in request} -key {that we have just now generated} {keyname} -out {output the certificate signing request} name {name with .pem extension}
Now the next command is as follows,
openssl req -new -key key.pem -out csr.pem
Once you give this command, you should see the following questions asked and kindly give your details and not mine,
Step 3:
Once you’re done with step 2, all that is left is to create an ssl certificate from csr which was created using the private key.
Before we jump into the code we need to understand the public key standards,
X509 → which defines the format of the public key certificates, X.509 certificates are used in many Internet protocols, including TLS/SSL, which is the basis for HTTPS, the secure protocol for browsing the web. They are also used in offline applications, like electronic signatures.
Now let’s look into the code structure,
Openssl {public key standards} {request} {number of days certificate will be valid} {pass in certificate signing request file} csr.pem (in our case) {signkey} {key which we generated in step 1} key.pem (in our case) {output} {name of the file with .pem extension}
Code looks something like the below.
openssl x509 -req -days 365 -in csr.pem -signkey key.pem -out cert.pem

If you have reached so far without any error then, you have followed my blog properly.
Yes, it is time for the victory lap now as you have climbed half the well already.
Now rest is just to create the Node js app and host that up in the EC2 server instance.
If you have just cloned my git repo then I have already given details about how to run the application in my git repo just follow it and don’t follow these instructions as I am doing things from scratch here.
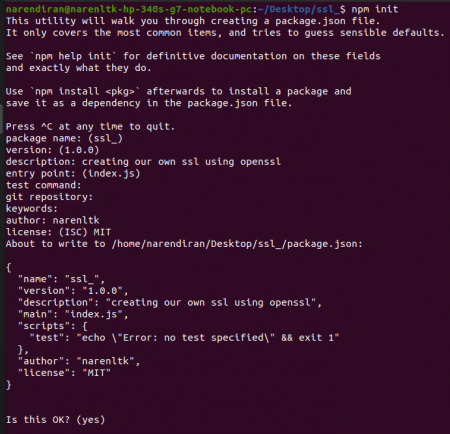
First, we need to do npm initialization in out ssl_ folder and give the following command and fill in the details as per your wish,
npm init
Once done now, need to install the dependencies like node express and nodemon
Code is as follows.
npm i nodemon express
Or
npm i -g nodemon express
Once your done with this you need to do the following changes in package.json file that has been created as shown below,
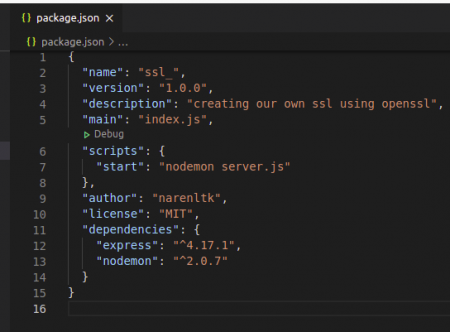
Here you would have made the changes in scripts alone.
Once you are done with the dependencies I have created a server.js file as shown below.
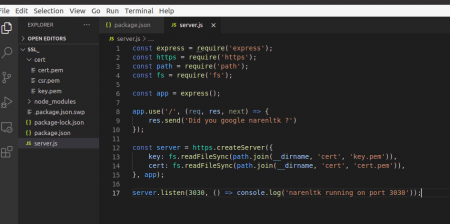
Once your done with the code, start running the code in the terminal as shown below,
The code is
npm start
Or
nodemon server.js
Or
node server.js
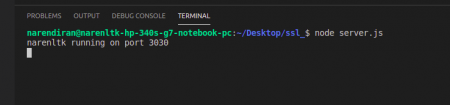
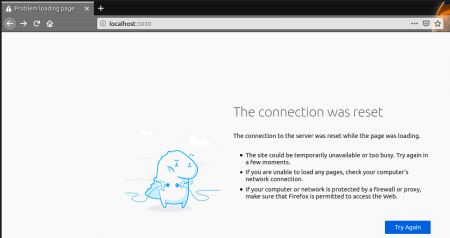
Alright it does stop here, to verify it you need to visit the localhost and verify it.
“http://localhost:3030”
This will throw up the following error,
Now try the same with the “https://localhost:3030” you will get the following error.
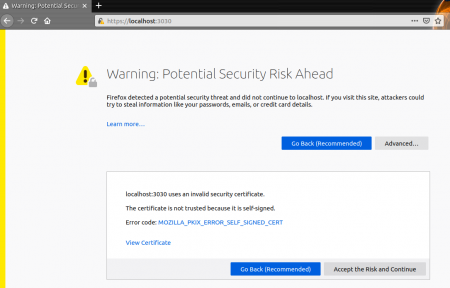
Here you can see that firefox has not allowed you but in the meanwhile you can accept the risk and continue or if you’re not still satisfied with it you may view the certificate and verify it for yourself. Which will give you the details of the validity, public key info i.e. which algorithm and key size and also the fingerprints i.e. the SHA-256 & SHA-1 details will be given.
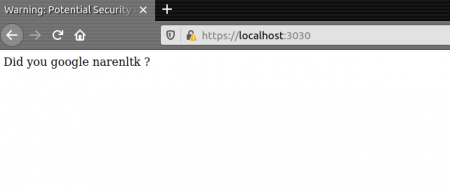
Once you accept all and proceed with it, you get the following output,
Apart from this, there are few places where people use SSL, i.e. the application of SSL which is where they used are as follows,
- Web Servers
- Application servers
- Databases
Why should we protect the above-mentioned services with SSL?
| Services | Why SSL? | Without SSL |
| Web Servers | It makes sure that there is a secure connection between the browser and web servers. | You will be haxored easily if simple Phishing happens. |
| Application servers | It secures data access service from the application server to other systems and databases. | Data will be modified by unauthorized people. |
| Databases | SSL secures data transfer across the network between instances of databases and other systems of that application environment. | Hackers can steal critical data stored in the database. |
Note:
Even with these types of security protocols Google, Facebook, Instagram, and Youtube are still tracking us legally and illegally.
So as long as people like Edward Snowden ( People with brains) are there in this world nothing is safe.
GitHub Link:
https://github.com/narenltk


Add your comment