While developing web applications, you must have experienced issues with development and testing servers, especially while accessing your local systems over the internet, right? we are guessing the answer would be yes, as almost all of us have faced … Continue reading →
While developing web applications, you must have experienced issues with development and testing servers, especially while accessing your local systems over the internet, right? we are guessing the answer would be yes, as almost all of us have faced the issue multiple times. Many developers remain concerned over the security of their applications in this phase, while many others get hiccups while testing multiple IoT devices. But have you ever searched for a reliable application that will help resolve all these issues? Well, we have got you a solution today!
If you want, you can try ngrok! It is one of the easiest programmable network applications out there. And if you are not willing to do so, well…we will tell you how to create your own ngrok-like application from scratch, in this blog! So, keep reading and start creating your own ngrok!
What is ngrok?
ngrok is a very popular application that allows our system to be accessed via the internet. We can test mobile apps by connecting to our local system or build demo websites, notification URLs, etc. There are a lot of alternatives but we have found this one to be the simplest and quickest to get started.
Technically speaking, it is a set of globally-distributed network proxies that front your web applications running in any cloud, local, private network, or even your machine setup. ngrok claims that while doing so, you don’t need to change your code at all. It simply puts the local host on the internet and lets you develop consumer webhooks, demo websites, and much more!
Hence, it has the potential to completely eliminate all the issues faced while accessing local systems over the internet. In fact, you don’t even have to change any of your existing network settings and if you want, you do not need to even connect to a VPN!
The multiple applications of ngrok make it one of the most desirable applications for many developers. But do you know, creating a ngrok-like application for your own is not that difficult! But before we just into that section, we must properly understand how ngrok actually works!
How does ngrok work under the hood?
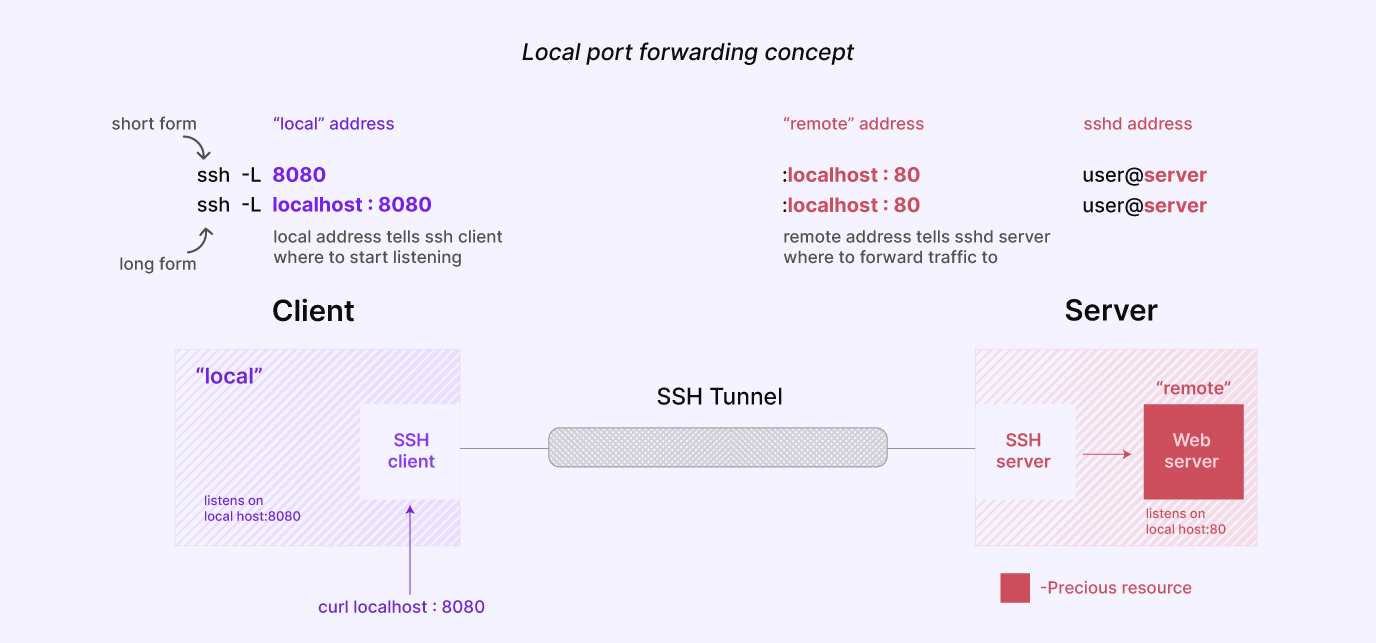
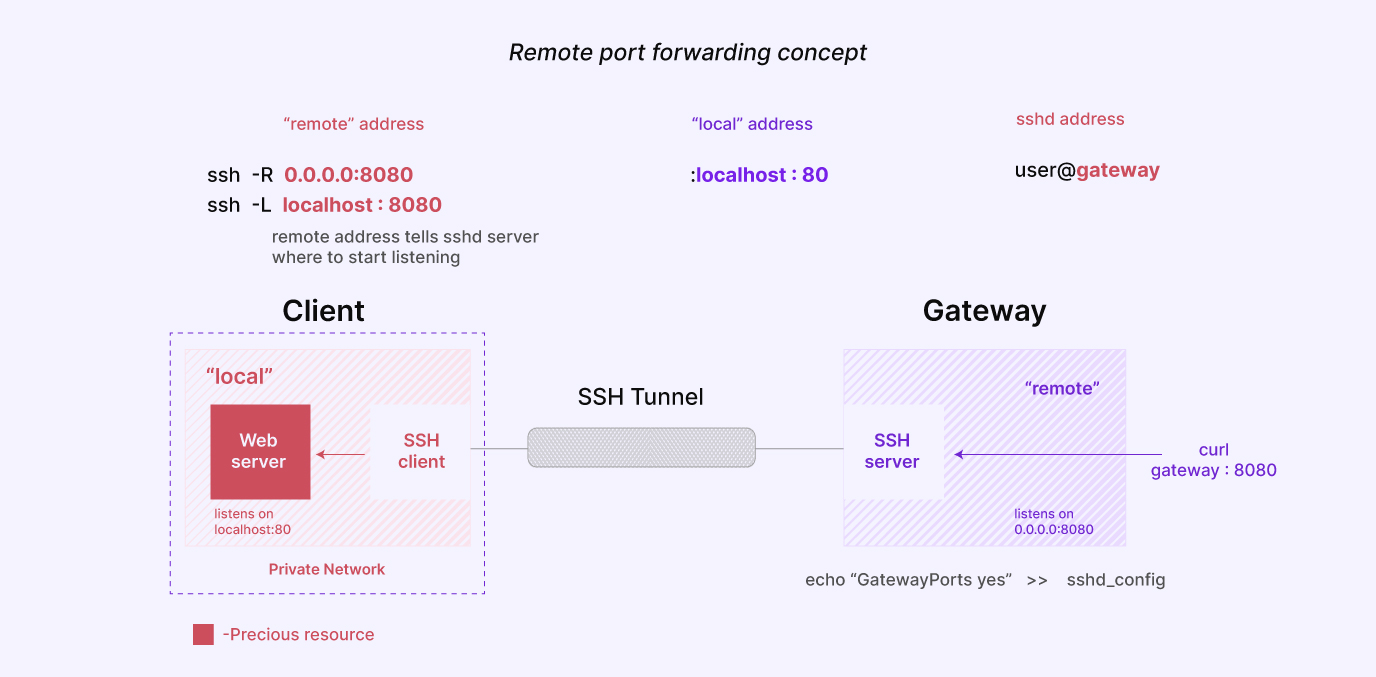
ngrok uses ssh tunneling where an ssh connection is made between the local system and a remote system through port forwarding. There are 2 types of port forwarding i.e. local port forwarding and remote port forwarding.
Credit – iximiuz.comCredit – iximiuz.com
Here, we can clearly see that ngrok uses the remote port forwarding concept.
Here the left-hand side localhost:remote_port refers to the server, and remote_port can be any port number that is not used.
Now that we have got a basic understanding of how ngrok actually works, let’s dive into creating our own ngrok!
Create your own ngrok
If you have a server and can ssh into it, then you can easily create a ngrok-like application for yourself. Then, you don’t need to use any third-party ssh tunneling application like ngrok anymore.
Here, we are using an example that is based on an EC2 instance, that has a web server apache2 installed. Our purpose is that when someone hits the EC2 instance public IP in the browser it will serve from my localhost.
Steps to follow:
1. First, we created an EC2 instance from the AWS console. We logged into the ec2 instance using the below command:
Here your_key.pem is my key file and is the public IP of the ec2 instance xxx.xxx.xxx.xxx.
2. Next, we installed the apache2 server and enabled its reverse proxy modules.
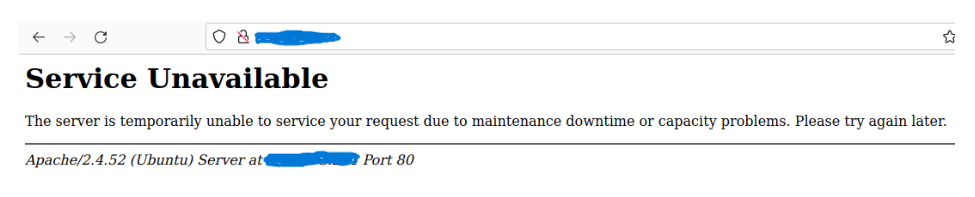
Here, the reverse proxy forwards any request to 80 to port 8080. We are using this reverse proxy here because port 80 is already used by the web server and it cannot be used for ssh tunneling. So, if we run the URL now in the browser then it will not work as there is no application listening to 8080.
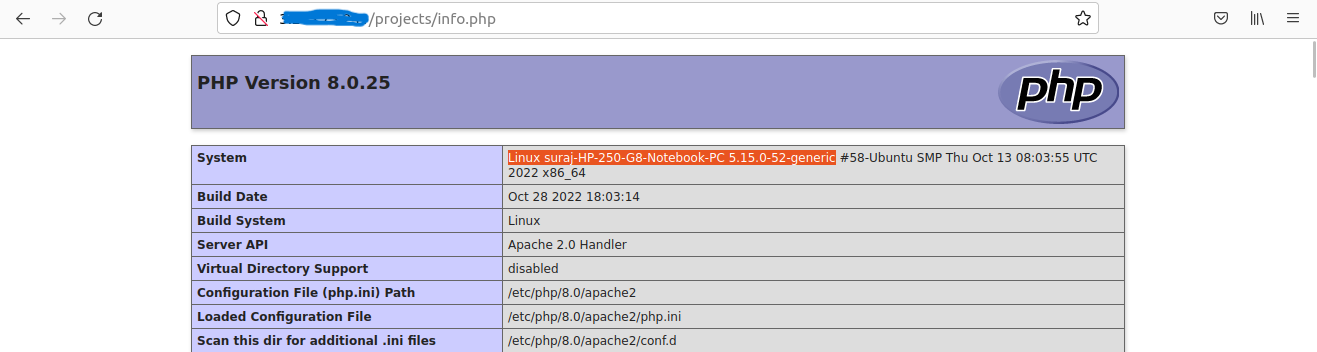
3. Finally, we established the ssh remote tunneling
As you can see, now we can browse from the local system.
Should we use our own tunneling?
So, one question must be arising in your mind right now – why should we use our own tunneling, when alternatives like ngrok are already available?
The answer to this question is subjective. If your intention is to use it for a quick demo or testing purpose, then using your own architecture is not desirable, as ngrok will prove to be a much simpler process.
However, if you are working on an important project, and already have a server and a static IP or domain name, and do not want to open up your local system to any unknown server then you can definitely go for your own tunneling. It will make the process much more secure and efficient. The choice is yours!
Author Credit:
Before we say goodbye to you all, we must give credit where it’s due – this blog was drafted by Suraj Kumar Mohapatra, software development manager of our player pod, who has brainchild the entire procedure. Further, the blog was edited and fine-tuned by Debarpita Banerjee. We hope you enjoyed reading it!
Debarpita is a Content Writer with Muvi. With around 2 years of experience in content creation, she has worked across industries like SaaS, EdTech, eLearning, AR-VR, and Metaverse. She believes in delivering content that can be of some value to the readers. In her free time, she likes to try her hand at website and app development.


Add your comment