NAT (Network Address Translation) traversal servers in WebRTC are the reason that media gets properly connected and those servers are STUN and TURN.
What is Turn Server?
Traversal Using Relays around NAT is a protocol that assists in traversal of network address translators or firewalls for multimedia applications.
It may be used with the Transmission Control Protocol and User Datagram Protocol. It is most useful for clients on networks masqueraded by symmetric NAT devices.
When Turn Server is needed?
On a typical webRTC app, about 20% of connections require a TURN server. It may work fine for you, but try accessing your webRTC service from a cell phone connection (which will usually require TURN), and you’ll see that not all connections are equal when it comes to p2p.
For peer-to-peer, you will need to install and run a TURN server.
But the question is why?
Because some firewalls block certain types of traffic. Many just block UDP but some may even block TCP.
Turn server Hardware
It is not mandatory that we should have a higher configuration or something. You can make the setup even with basic configurations like using a free tier instance which is available in the AWS for EC2 i.e. t2.micro.
If you wish to test whether your browser supports this webRTC then you can test it out here.
Link: https://test.webrtc.org/
All right Now let’s start to implement it from the EC2 instance,
Step 1:
Here you can just grab whatever is available in the free tier for the EC2 instance.
Step 2: EC2 Instance security group settings
The only changes while launching an instance is in the security groups, I have given the details of the security groups port then we need to
UDP → 32355-65535, 3478-3479
TCP → 32355-65535, 3478-3479
Step 3: Install coturn
Coturn is an OpenSource Implementation of TURN and STUN Servers.
Code is as follows,
sudo apt-get -y update
sudo apt-get install coturn
Step 4: Stop the Coturn Server & make the changes
Before we do any changes we need to stop the coturn server first.
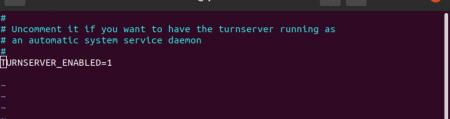
Then we need to uncomment the TURNSERVER_ENABLED=1 and move the following location,
Code is as follows,
sudo systemctl stop coturn / sudo systemctl stop coturn.services
sudo vi /etc/default/coturn
Now uncomment and it should look like the following,
Step 5: Make changes in the turnserver.conf file / coturn setting file
Move to that location or else open the file from the following location,
Code is as follows,
cd /etc/
Then you need to open either using a vim editor / nano editor / vi editor in super user mode
Code is as follows,
sudo nano turnserver.conf
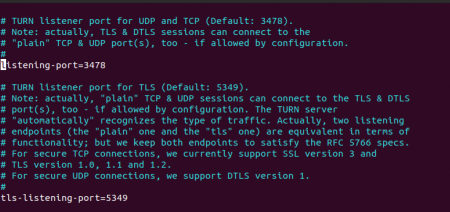
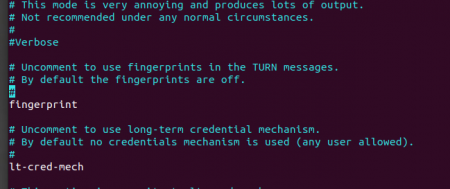
Remove the comments from the following lines, and add any necessary information.
Now you need to update your own public IP of the EC2 instance which you have configured.
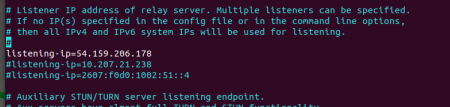
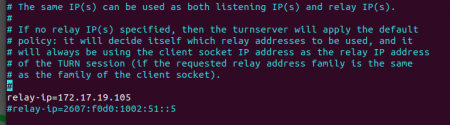
Here also you need to configure the same give the EC2 instance Public ip, i.e. listening ip and relay ip should be the same, but in this example it’s different since I restarted my EC2 instance.
Here there is an update given by the official creator since it is 2021, they gave an update it seems
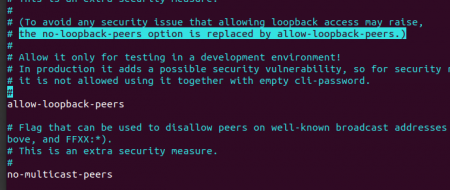
Here you can see that the “no-loopback-peers” option has been replaced by “allow-loopback-peers”.
It is up to you to comment that or uncomment but I highly recommend you all to comment that line.
Once you have done all these properly then you’re good to go.
Step 6: start the coturn server
Since we have stopped our server in step 4 we need to start it up,
Code is as follows,
sudo systemctl start coturn / sudo systemctl start coturn.services
Then you need to verify it using the following code,
sudo systemctl status coturn / sudo systemctl status coturn.services
Once you hit enter you should see the out and it should show you the output as “ active (running) “.
You can check and verify this in the following website,
Link: https://webrtc.github.io/samples/src/content/peerconnection/trickle-ice/
Here you can see the currently working Stun Server i.e. the free public server which is hosted by our Uncle Google. Well, there will be an option to change the details in the ICE Server. You need to first
- Reset to defaults
- Select and remove the details in the ICE Servers
- Then enter the turn server details
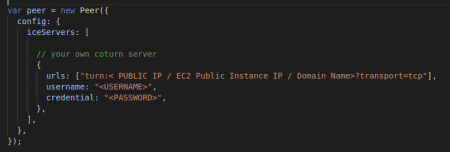
turn:< PUBLIC IP / EC2 Public Instance IP / Domain Name>:3478?transport=tcp
4. Then given the username as “ <USERNAME> ” and password as “ <PASSWORD> “
5. Then hit “add Server” select “Get Candidates”
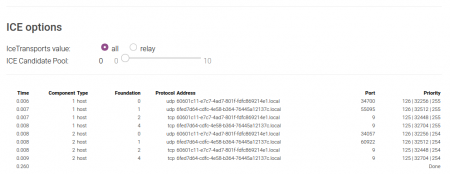
You should always see the “Priority” column should give a result “Done” or if it is not configured properly you will end up with an output “Unreachable”.
But if you need to update your own uname, password or you need to update your own certificate and key with domain all can be done just proceed to scroll and look further options and you will find the following details below,
user
cert
pkey
server-name
I will let you guys do the changes on this.
Once you have done all the changes you to add the details in the following way to your code,


Add your comment