Hey guys, welcome to 2021 and I know it is very late to wish everyone !!!
It’s a new year and the right time to learn something new, I mean yes so let’s look into this new concept, it’s OpenCV. Yes it is OpenCV not with python and since it is a new year let’s learn a new language i.e. let’s learn OpenCV with Node JS. Since OpenCV has played a vital role in Computer Vision applications let’s do the same in web applications like Face Detection, Face LandMark Detection, Face Recognition and even Object Recognition with Deep Neural Networks etc…
Well, we all know how to get a camera feed from our lappy or simply local machine. But we have all done that using OpenCV with Python and not even with C++. If you guys have done it, that’s really great.
Here in this tutorial we will get the camera feed and put that into a node app and host it up using Express Node js and Socket IO.
Let’s cut the talk and get to the implementation part, before diving deep into the AI part of opencv4nodejs let’s first the basic steps to be followed,
Step:
- Import the required libraries.
- Capture the Video feed from the local machine.
- Get the Video feed and stream it into a web app.
- Create a basic html file or create an EJS template.
- Include Socket IO library in the Client-side
- Connect your client-side to either the localhost or any network
- Make the client listen to that image and encode it
- Now set a constant value for FramesPerSecond
Step 1:
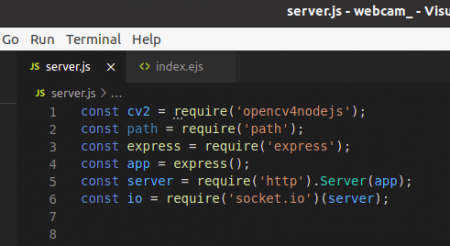
Here the required Libraries are
- Opencv4nodejs
- Express
- Http
- Socket IO
- Path
Import them as shown
Step 2:
Now we need to Capture the Video feed from the local machine,

You guys can see doesn’t this look like python code, if you’re a true Python programmer you definitely remember this and the answer is hell yes … !!!
I guess OpenCV cheated on us guys .. !!!
Step 3:
Get the Video feed and stream it into a web app using proper time interval i.e we are going to do a public broadcast to anyone who is listening to our server.
This is our server-side by the way.

Here we have obtained the video capture and encoded the image. We are encoding because all the images that have been captured are always read in the matrix format and that is the main reason we need to encode them to base 64 and that string is then broadcasted with the almighty Socket IO.
Looks like all the setup needed for the server-side has been done. It is time to move to the client-side.
Step 4:
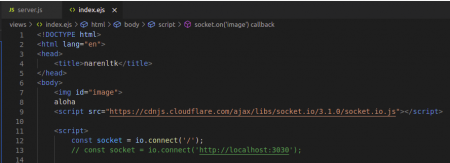
For the client-side instead of creating a normal HTML file, I have created an EJS template and if you’re going to do a git repo kindly follow my GitHub when I have given the required details of how to use it if you are doing a git clone.
Step 5:
Now include Socket IO library in the Client-side i.e. use the
Link: https://cdnjs.com/libraries/socket.io
I will let you guys do the research about the Content delivery network node js (cdnjs) of Socket IO i.e whichever version you want you may use and rather than using what I have used.
Step 6:
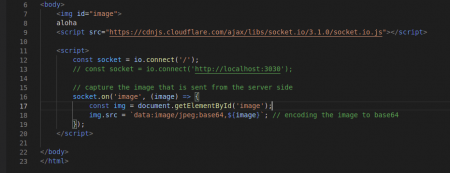
Connect your client-side to either the localhost with assigned port or else make it listen to any network as I have done.
You can refer to the image given above for this.
Step 7:
Now need our client to listen to that image and encode it as shown,
Step 8:
I guess we are all done. Now all we need to do is set a constant value for FramesPerSecond and you can also change it and have fun. This is on the server side. Try to make the FramesPerSecod = 10 and change it to 50 then make it 100. You will enjoy the output.

Have fun with OpenCV4nodejs…
If you wish to host it using ngrok I have given the details in GitHub and moreover, if you wish to add an SSL certificate to your node application then follow the blog links given below.
GitHub Link: https://github.com/narenltk


Add your comment