Do you know that 50% of video consumers globally watch videos without sound? Yes, they prefer to watch videos inside a busy train or metro, inside a bank while waiting for their turns, or sometimes even in their office during lunchtime. That is why they always prefer watching videos with subtitles. In fact, 80% of the viewers say that they will watch the full video in one go if it has subtitles! The combined effect of all these conveniences is at least a 15% increase in the viewership of videos.
And wait a minute, this is not the only reason for adding subtitles to your videos. In fact, the primary reason for adding subtitles to videos is to localize them. By adding subtitles in multiple languages, you can spread your videos across the globe,enhancing accessibility for educational streaming content where learners of diverse linguistic backgrounds need clear, subtitled instruction.
So, how can you add subtitles to your videos, so that you can reap all the benefits of subtitles? We will discuss the process in this blog in detail.
How to Add Subtitles To Your Videos With MUVI
If you have developed your OTT platform using MUVI, you can add subtitles to your videos very easily. You just need to follow the steps given below. If you are not on MUVI, then click here to start your 14-Day Free Trial today!
Step-by-step process for adding subtitles to videos:
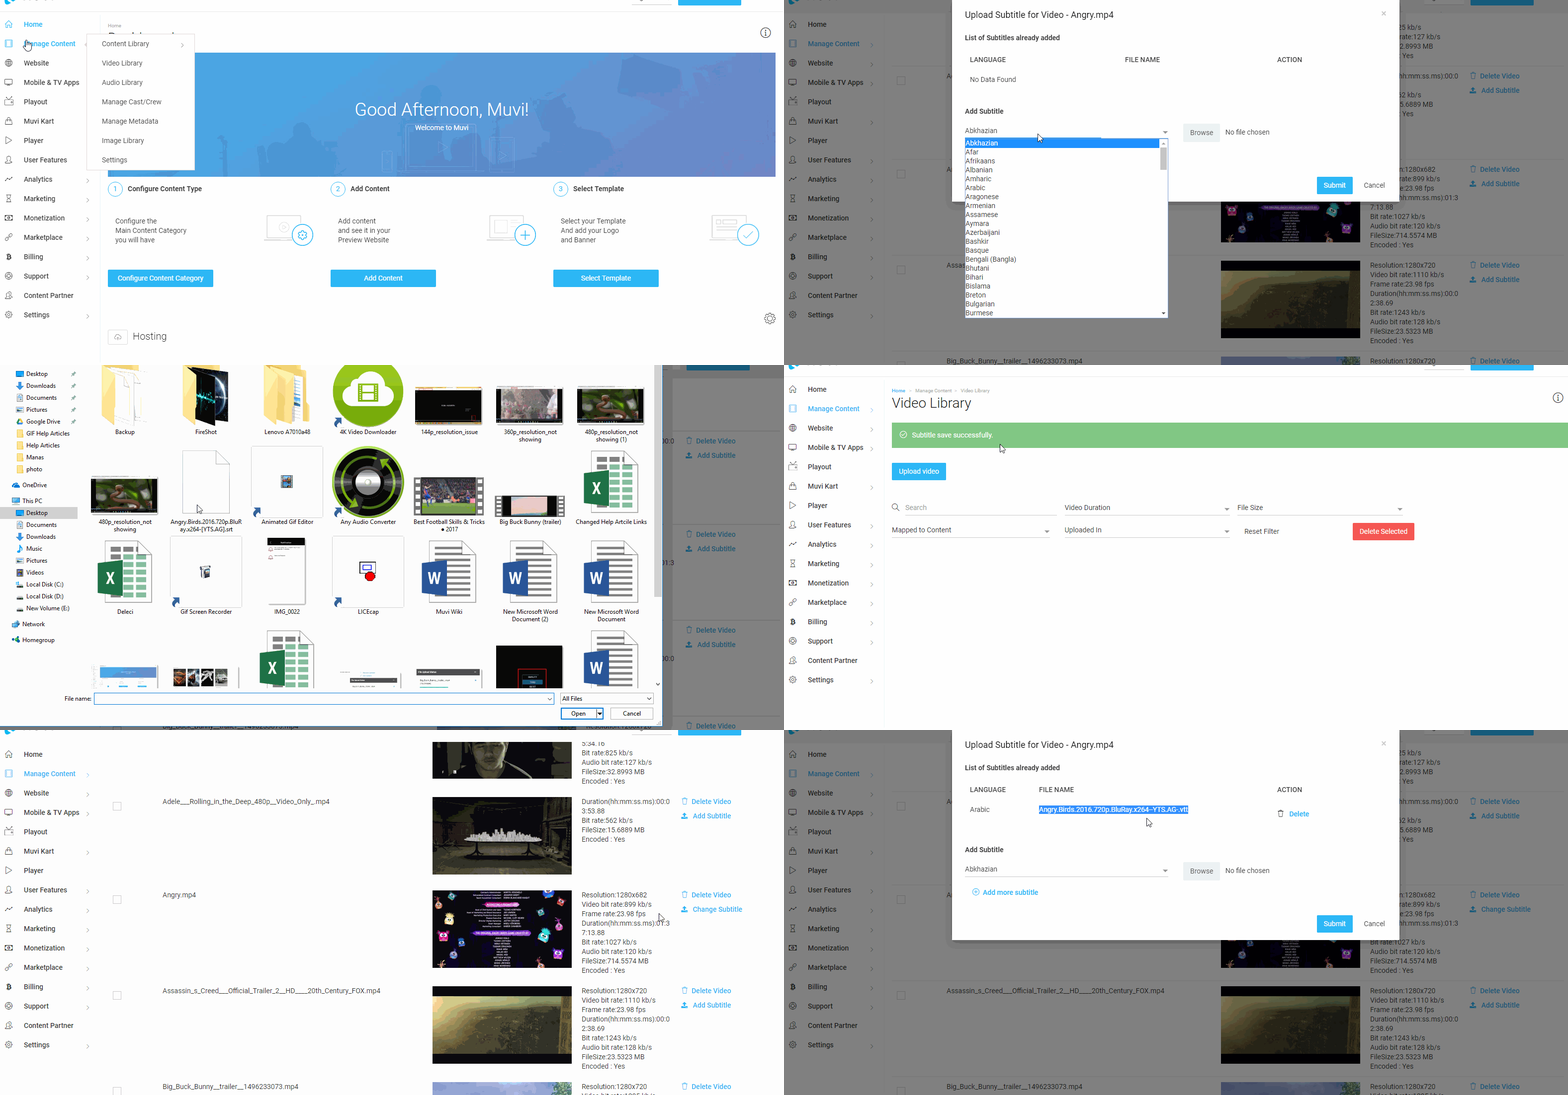
- For adding the subtitles, you first need to go to “Manage Content”, and then click on “Video Library” in your MUVI CMS.
- In your Video Library, you will find the “Add Subtitles” button in the right-hand side of the video. Once you click on it, a window will pop up.
- Under the popup menu of “Add Subtitles”, you will have to select the language of the subtitle from the drop-down menu.
- After selecting the language, you will have to upload the subtitle file. Click on “Browse” to upload the .SRT, VTT, or DFXP file.
- Once you click on “Submit”, your subtitle will be added to the video.
- For subtitles in multiple languages, keep repeating the above-given steps to add another subtitle in a different language.
- Once you have added subtitles in all the desired languages, it’s now time to map the video to your content. Please keep in mind that you should NEVER delete the video in the video gallery. Because if you delete the video from the video library, then the video will be played without subtitles.
- While playing the video, your viewers can select the subtitle for a particular language in the player from the “Subtitle” button.

You can read the process in detail here.
Adding Bulk Subtitles: A Quick Trick
After going through the above process, you might say that it will take time to upload subtitles to multiple videos in multiple languages. That is why, to make this process seamless, we have a special technique for uploading the subtitles in bulk.
Step-by-step process for adding subtitles in bulk:
We use an FTP account for uploading subtitles in bulk. Also, you will need to install an app called FileZilla during this process. So, please upload the app before starting the process, in case you don’t have it already. Once you are all set, start following the steps given below.
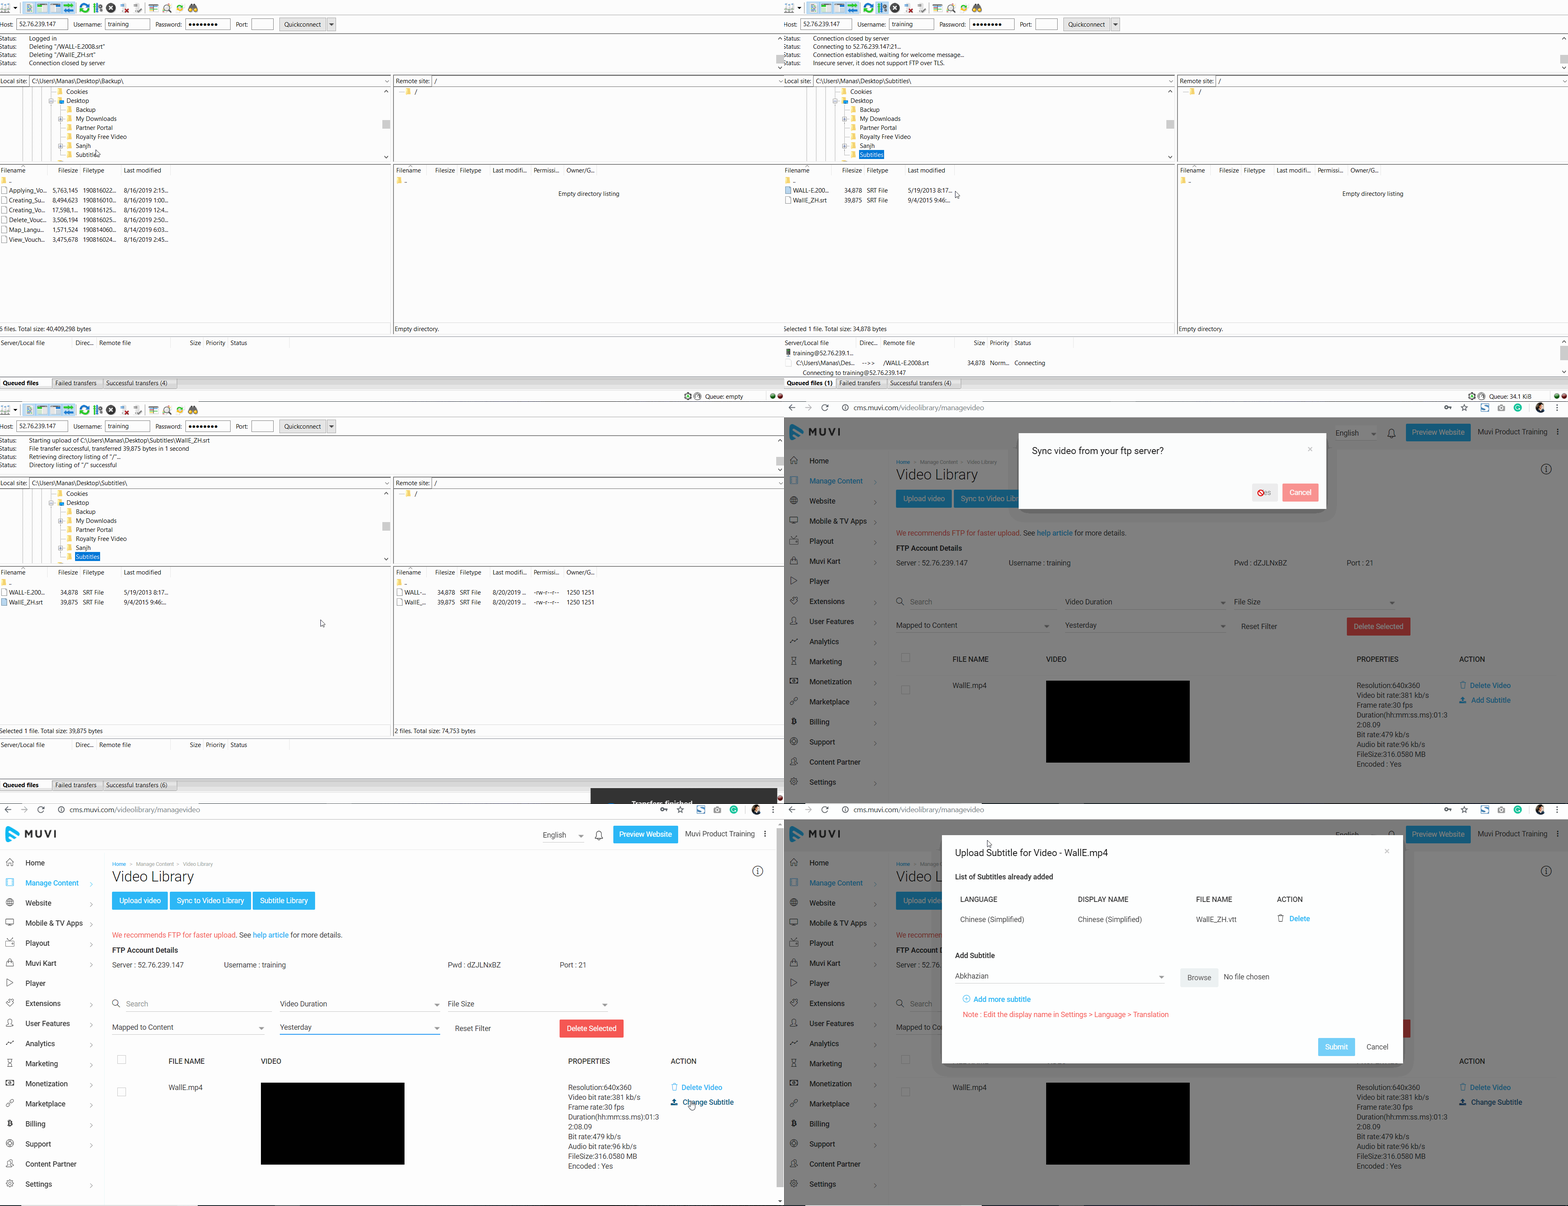
- First login to your MUVI CMS, and find out your FTP account details provided in your CMS.
- Then, log in to the FTP account using the FTP account details given in your CMS.
- Login to FileZilla as well, using the same FTP account details.
- After connecting your FileZilla account with your FTP account, you can upload your subtitles.
- But, before you start uploading the subtitles, you must rename them according to the video. This will help in the automatic mapping of subtitle files with their respective videos.
- Once you have uploaded the subtitle files, click on “Sync to Video Library” on your video library page.
- This step will upload all your subtitles to your “Subtitle Library”.
- Once the subtitles are uploaded to the ‘Subtitle Library”, they will automatically get mapped to the corresponding videos.
In case you find videos that have not been mapped correctly to their respective subtitles, you can map them manually too! For doing so, you need to follow the steps given below.
- Go to “Manage Content” and enter “Video Library” in the CMS.
- After entering the Video Library, go to “Subtitle Library”.
- In the subtitle library, subtitles that haven’t been mapped yet will show the option of “Map Video”.
- After clicking on “Map Video”, select the subtitle language from the drop-down.
- Then, select the video with which you want to map the subtitle.
- A confirmation message will pop up on your screen, asking for your permission to map the video. In that pop-up, click on “OK”
- Repeat the steps given above for all the unmapped subtitle files.

And it’s done. All the subtitles are now successfully uploaded and mapped to their respective videos.
Tips For Developing Quality Subtitles
The quality of subtitles is very important for OTT platforms. You just cannot write anything on your subtitles, as it will irritate your audience to the core. For better results, you should follow the tips given below while developing your subtitles.
- Make sure that your subtitles appear at the same time as the actors speak the words on the screen. But here is a catch. If the subtitles pass too fast, no one will be able to read it. That is why, if you feel that the subtitles are longer than the time available, you can slow down the video a bit, to adjust the speed of the subtitle.
- Choose a suitable space for displaying the subtitles. Sometimes, the subtitles overlap important parts of the screen, creating hindrances for the viewers. Avoid this situation, by adding the subtitles on either the extreme lower side of the screen or having dynamic subtitles which adjust to free screen space automatically.
- Another thing to notice is the color of the subtitle text. Sometimes, the color of the text matches the color of the environment. In such scenarios, the audience finds it hard to read the subtitles. You can avoid it by adding a translucent background to the subtitles, which will separate the text from the actual video environment.
How do Subtitles Help Your OTT Business?
Now you might be wondering, why you should do all these processes and add subtitles to your videos. How will it benefit your business? Let me answer your question with some solid numbers.
- Firstly, there are around 466 million deaf and hard-of-hearing people across the world. These people solely depend on your closed captions and subtitles for watching the videos. If you do not add subtitles, you are losing out on millions of potential consumers.
- Secondly, subtitles help you in making your video localized. You can add subtitles in multiple languages so that people from all over the world can view your videos. This is particularly important because only 360 million people across the world are native English speakers.
- Third, videos with subtitles find an advantage in search engine optimization. Also, they can grab the consumer’s attention very quickly, and keep them engaged for a longer period of time. All this results in an increased view time for your videos.


Add your comment