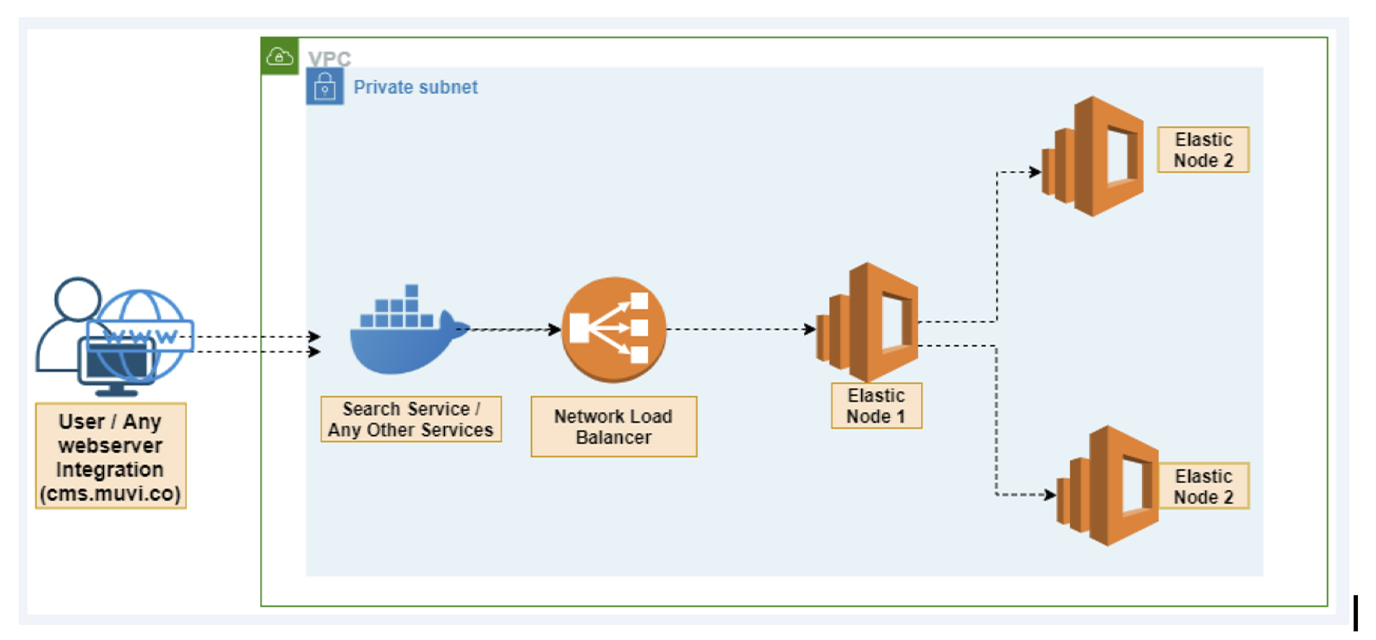
What is Elasticsearch Cluster?

An elastic-search cluster is a group of nodes that have the same cluster.name attribute. As nodes join or leave a cluster, the cluster automatically syncs itself to evenly distribute the data across the available nodes.
Each node in an Elasticsearch cluster serves one or more purpose:
- Master-eligible node – A node that has node.master set to true (default). It is responsible for lightweight cluster-wide actions such as creating or deleting an index, tracking which nodes are part of the cluster, and deciding which shards to allocate to which nodes.
- Data node – A node that has node.data set to true (default). Data nodes hold data and perform data related operations such as CRUD, search, and aggregations.
- Coordinating node – Its main role is to route search and indexing requests from clients to data nodes. It behaves as smart load balancers.
In this guide, we are going to set up a two node Elasticsearch cluster with each node being master eligible.
Muvi Environment:
Installation
- sudo apt-get -y install apt-transport-https curl wget
- sudo wget -qO – https://artifacts.elastic.co/GPG-KEY-elasticsearch | apt-key add –
- sudo echo “deb https://artifacts.elastic.co/packages/7.x/apt stable main” | tee -a /etc/apt/sources.list.d/elastic-7.x.list
- sudo apt-get update && apt-get install elasticsearch=7.5.2
Set Elasticsearch Cluster name
On each node, open the Elasticsearch configuration file and set the name of your Elasticsearch cluster.
Step1:
vim /etc/elasticsearch/elasticsearch.yml
# Use a descriptive name for your cluster:
cluster.name: muvi-cluster
Set Descriptive names for Elasticsearch Nodes
Step2:
Node 1
…
# ———————————— Node ————————————
# Use a descriptive name for the node:
node.name: muvi-node-01
Node 2
# ———————————— Node ————————————
# Use a descriptive name for the node:
node.name: muvi-node-02
Step 3:
Disable Memory Swapping
Swapping affects the stability of Elasticsearch cluster as it can cause nodes to respond slowly or even to disconnect from the cluster. Once of the ways of disabling memory swapping is by enabling memory lock. Hence, uncomment the line bootstrap.memory_lock: true.
# ———————————– Memory ———————————–
# Lock the memory on startup:
bootstrap.memory_lock: true
I recommend that you disable swapping using systemd by editing Elasticsearch service and adding the content below;
Step:4:
systemctl edit elasticsearch
[Service]
LimitMEMLOCK=infinity
Step:5:
Whenever a systemd service is modified, you need to reload the systemd configurations.
#sudo systemctl daemon-reload
Step: 6:
One of the recommended ways to disable swapping is to completely disable swap. This is fine if Elasticsearch is the only service running on the server.
swapoff -a
Step: 7:
Define the Roles of each Elasticsearch Node
As stated above, you can assign each node a respective role as master, data node, ingest node, coordinating node.. In this setup, we will configure all the three nodes to act as both master and data node.
# ———————————- Cluster ———————————–
# Use a descriptive name for your cluster:
cluster.name: es-nodes
node.master: true
node.data: true
Step: 7:
Discovery and cluster formation settings
There are two important discovery and cluster formation settings that should be configured before going to production so that nodes in the cluster can discover each other and elect a master node;
- discovery.seed_hosts and cluster.initial_master_nodes.
discovery.seed_hosts setting Provides a list of master-eligible nodes in the cluster. Each value has the format host:port or host, where port defaults to the setting transport.profiles.default.port. This setting was previously known as discovery.zen.ping.unicast.hosts. Configure this setting on all Nodes as follows;
# ——————————— Discovery ———————————-
# Pass an initial list of hosts to perform discovery when this node is started:
# The default list of hosts is [“127.0.0.1”, “[::1]”]
discovery.seed_hosts: [“60.0.7.29”, “60.0.7.46”]
Step 8:
# Bootstrap the cluster using an initial set of master-eligible nodes:
#cluster.initial_master_nodes: [“muvi-node-1”, “muvi-node-2”]
cluster.initial_master_nodes: [“60.0.7.29”, “60.0.7.46”]
Step 9:
Set JVM Heap Size
Elasticsearch sets the heap size to 1GB by default. As a rule of thump, set Xmx to no more than 50% of your physical RAM but not more than 32GB.
vim /etc/elasticsearch/jvm.options
-Xms1g
-Xmx1g
Step 10:
Set maximum Open File Descriptor
Open below file and LimitNOFILE
/usr/lib/systemd/system/elasticsearch.service
process
LimitNOFILE=65535
You also should set the maximum number of processes.
LimitNPROC=4096
Step 11:
Virtual Memory Settings
Open below file and add vm.max_map_count as shown below.
/etc/sysctl.conf
vm.max_map_count=262144
Or
#echo “vm.max_map_count=262144” >> /etc/sysctl.conf
#sysctl vm.max_map_count
vm.max_map_count = 262144
Step 12:
Running Elasticsearch
Reload the systemd manager configuration.
#systemctl daemon-reload
Enable Elasticsearch to run on system boot.
#systemctl enable elasticsearch
Start Elasticsearch
#systemctl start elasticsearch
You can check the Elasticsearch status running the command below;
#systemctl status elasticsearch.service

Step 13:
Check Elasticsearch Cluster Health
curl -X GET “<elbname>.elb.us-east-1.amazonaws.com:9200/_cluster/health?pretty”
root@ip-60-0-7-29:~# curl -X GET “<elbname>.elb.us-east-1.amazonaws.com:9200/_cluster/health?pretty”
{
“cluster_name” : “muvi-cluster”,
“status” : “green”,
“timed_out” : false,
“number_of_nodes” : 2,
“number_of_data_nodes” : 2,
“active_primary_shards” : 0,
“active_shards” : 0,
“relocating_shards” : 0,
“initializing_shards” : 0,
“unassigned_shards” : 0,
“delayed_unassigned_shards” : 0,
“number_of_pending_tasks” : 0,
“number_of_in_flight_fetch” : 0,
“task_max_waiting_in_queue_millis” : 0,
“active_shards_percent_as_number” : 100.0
}

Step 14:
Check the Cluster Nodes
#curl -X GET “<elbname>.us-east-1.amazonaws.com:9200/_cat/nodes?v”


Add your comment