Right recommendations to customers has the potential to convert a DVD based organization into a 25 billion US dollars organization. Don’t believe us? Well, we got one word for you – NETFLIX. Netflix started their journey as a DVD organization, and soon they shifted to a video streaming platform. But things started to change for them when they decided to integrate a recommendation engine with their platform. In 2006, they even held a contest for 1 Million US dollars for the best recommendation engine.
In this blog, we have explained what a recommendation engine is, and how one can integrate it with their website. So, if you are someone who owns a video streaming platform and is looking to up your recommendation game, this blog is meant for you.
What is A Recommendation Engine?
Recommendation Engine is a tool that analyzes user’s behavior and content available on a particular website, and then based on algorithms or filtering methods, it recommends content to users. We have already covered this topic in detail in blogs like – what is an AI-based recommendation engine and the evolution of a recommendation engine. You can give it a read for more in-depth understanding.
So now that you know what a Recommendation Engine is, you obviously need to find the right one as per your needs and understand how to integrate the same with your platform!
In this blog we will explore how simple or difficult it is for someone to integrate a recommendation engine with their existing platform!
Integrating Recommendation Engine with a Website or App
There are multiple recommendation engines available in the market, and the steps to integrate them, in general, are –
- Configure your platform on a Recommendation Engine
- Find the relevant codes as per your platform and send them to your engineering team
- The engineering team will then do coding to integrate the recommendation engine
- Add the website’s data to the recommendation engine through API or Javascript
- Configure the data
- Create Banners/widgets for all recommendation types and then add it
- Add recommendation product’s Image URLs by using the relevant codes
- Add ‘Add to Cart’ option
- Select the Algorithm
- See the Output
The above ten steps are what recommendation engines usually follow. Sometimes, it can take weeks to understand these steps and then to actually implement them. The burden usually falls on the technical teams to collect all the relevant codes for their platform, and the end result cannot be made into a promise. Which is why we recommend taking a free trial of any recommendation engine before you finalize your decision.
However, if you are ready to go through all the steps and deploy a recommendation engine, then why not go with an engine which cuts the chase short and runs on AI (Artificial Intelligence). Alie. Alie is an AI-based recommendation engine that can be integrated with any website in mere five steps. The best part is that you get to go through the steps without any coding knowledge required and with assistance every step of your way. Here are the five simple steps of Alie through which you can integrate your website with it –
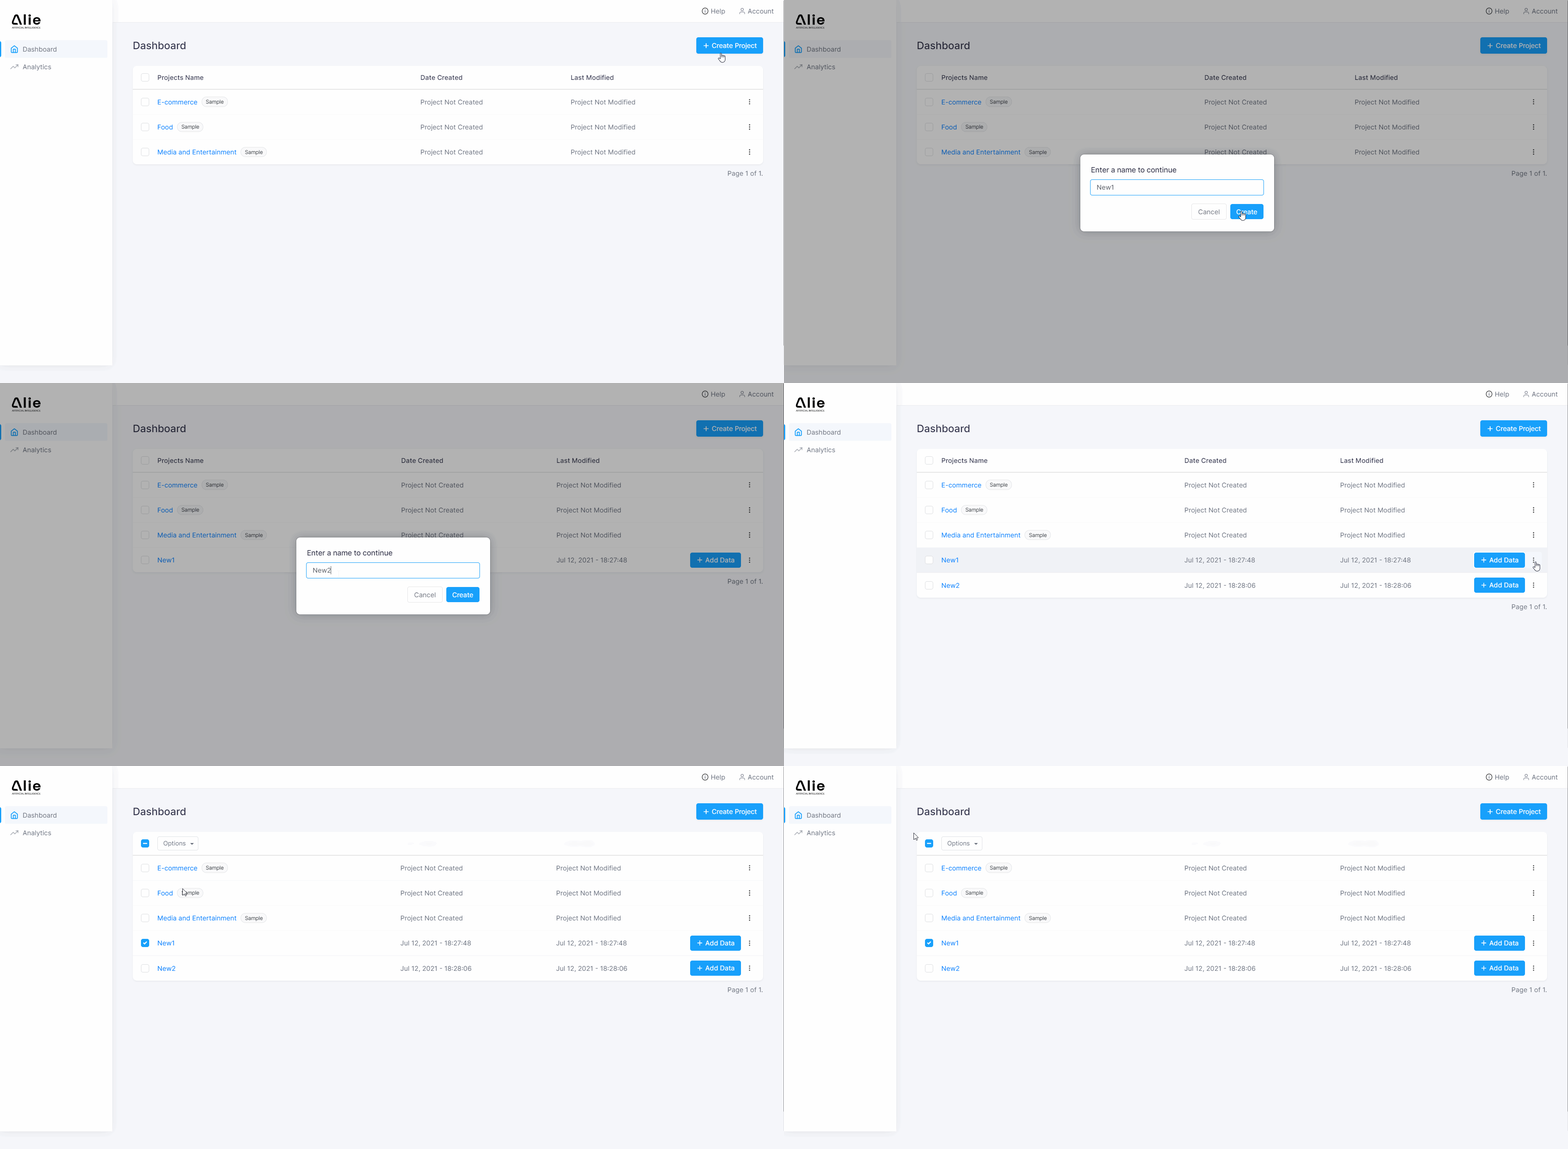
1. Create a Project on Alie CMS
The steps are quite simple to be performed by anybody. All you have to do is create a project by logging in to Alie. The benefit of using Alie is that you can create multiple projects if you wish to; this helps in comparing the different algorithms used and in deciding which algorithm works best for your website.
2. Add data
There are several factors that come into play when you are adding data to your project. The first and foremost is that if you only wish to see how Alie operates, then you can simply choose from the data available in Alie; the sample data covers the three prominent industries – E-commerce, Food, and Media & Entertainment.
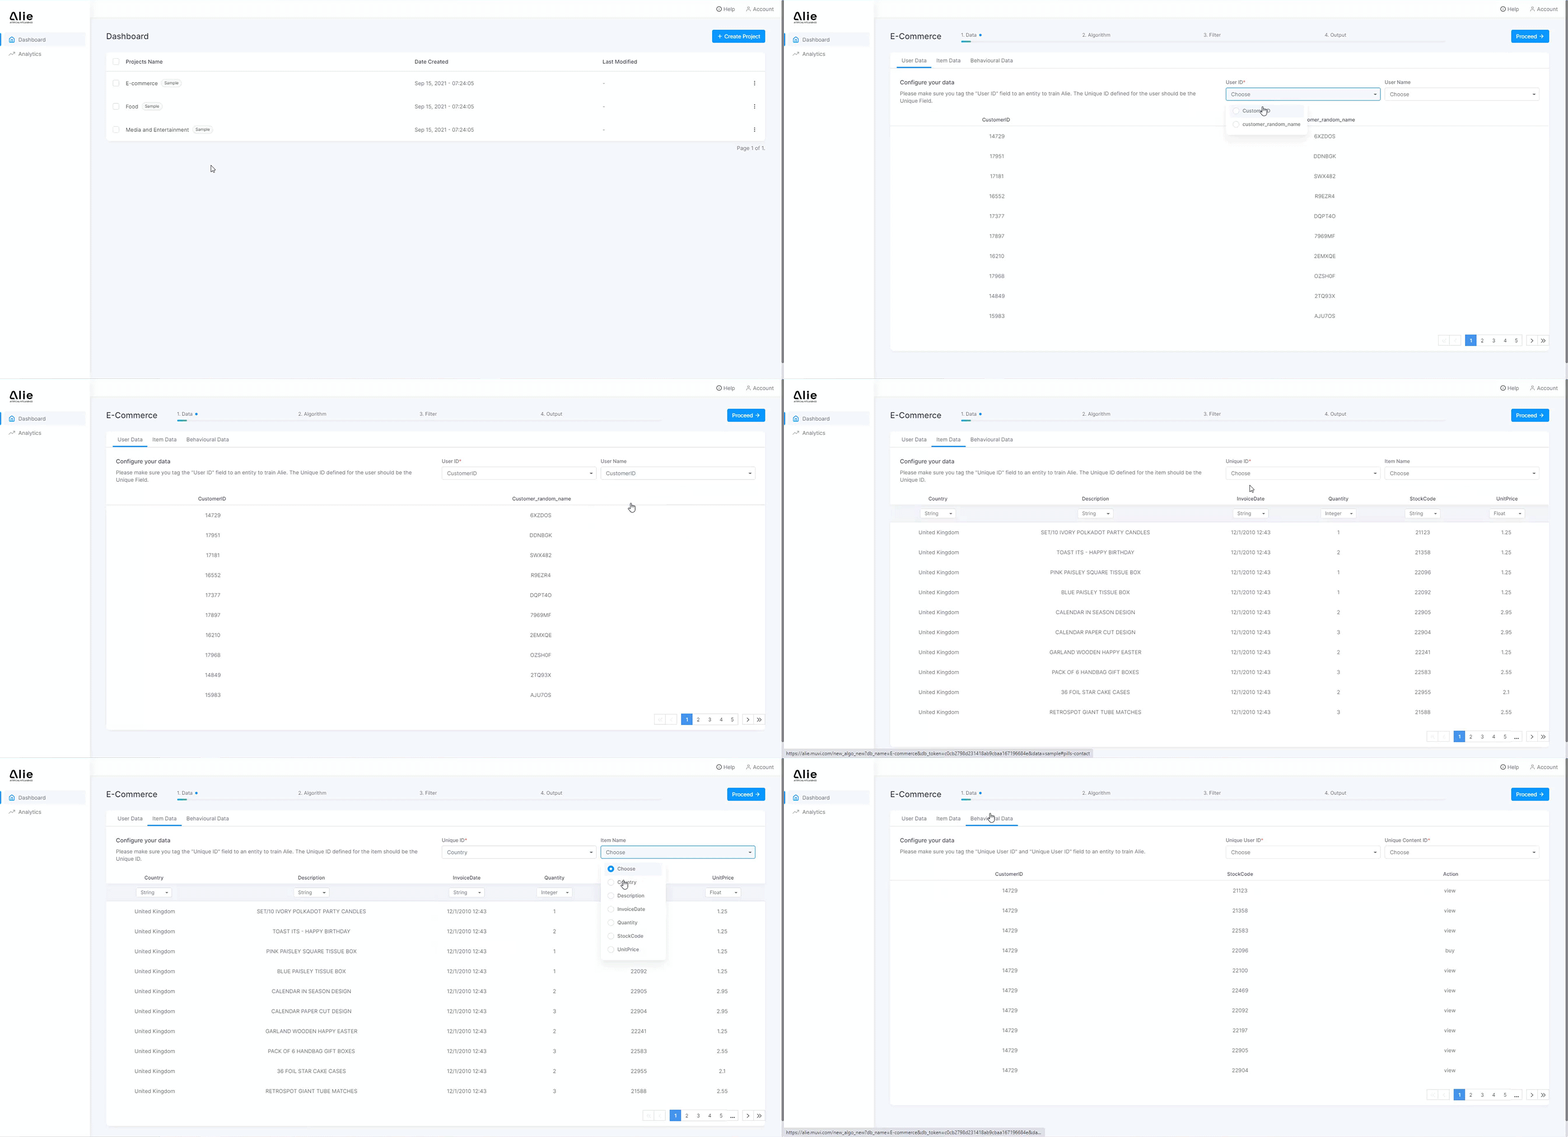
Now, if you want to try Alie with your website’s data, then there are two methods.
Adding Data Manually
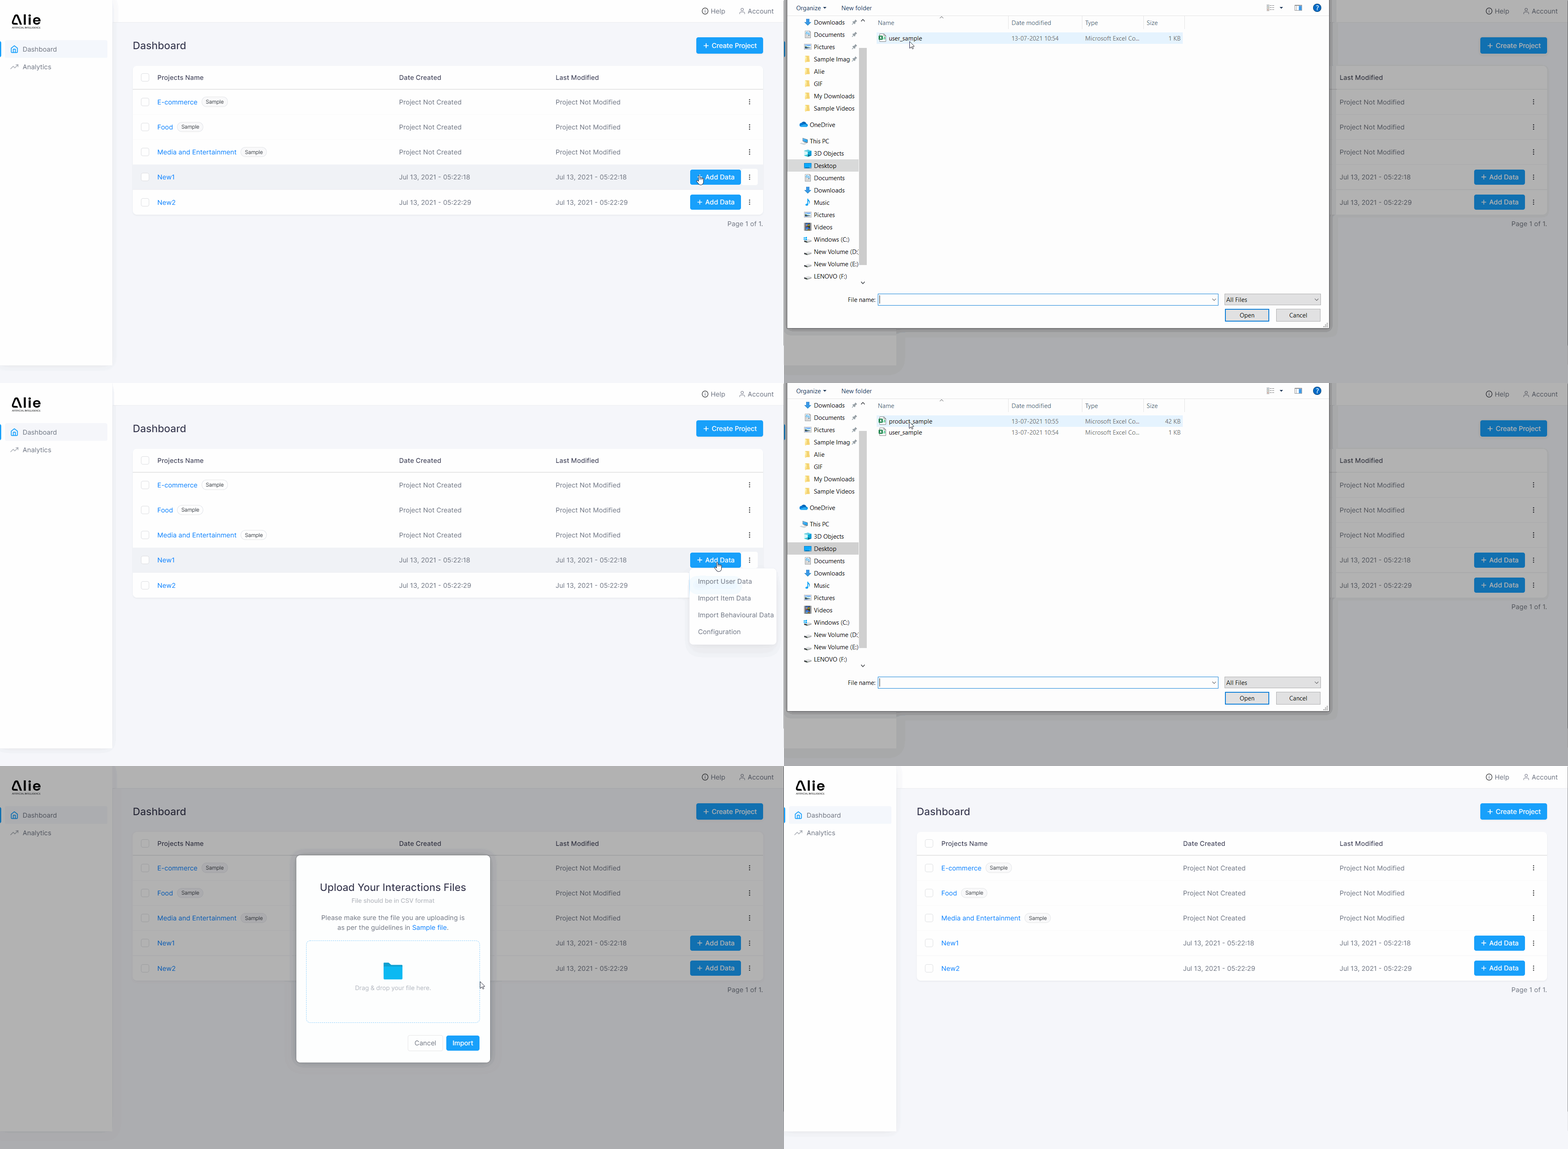
For this, one only needs to follow two steps, but remember in mind you will have to repeat these two steps for User, Content, and Behavioral data from your website.
- Click on ‘Add data’
- Add ‘Import User Data’, and add the file from your website. Repeat this by clicking on ‘Import Content Data’ and ‘Import Behavioral Data’.
Adding Data Automatically
For this, the steps are a little complicated, but once you are done with it the data will be automatically extracted from the website. You won’t have to add the data again and again.
API Integration
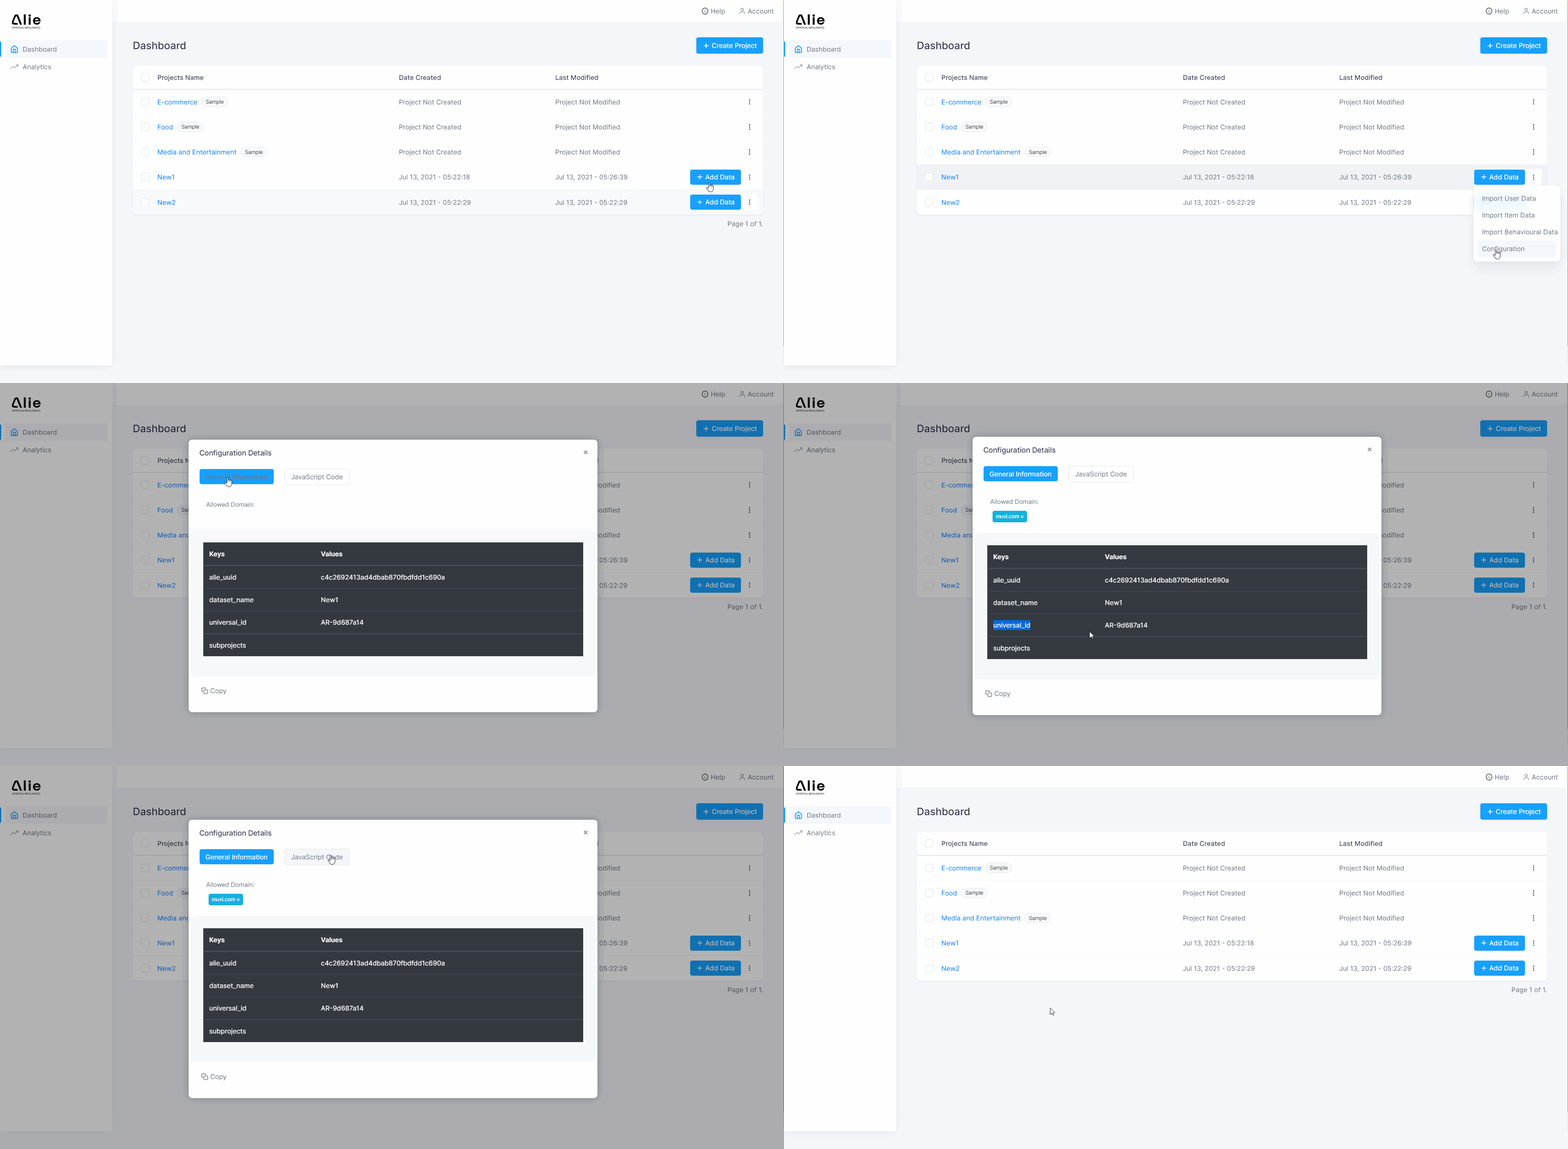
- Click on ‘Add data’
- Go to ‘Configuration’
- Click on ‘General Information’ and type your domain name
- Once you have added your domain name, you can see your data set and your universal ID for API integration. Important to keep in mind is that this universal ID will be different for each project you make under ALIE. To learn more about how you can add the data through API click here.
JavaScript Integration
- Click on ‘Add data’
- Go to ‘JavaScript Code’
- Copy the entire code by clicking on ‘copy’
- Paste the above code into the head of HTML file (Look the below video for reference)
- Your data can now be automatically imported from your website. To learn more about how to add different parameters of importing data through JavaScript Integration, click here.
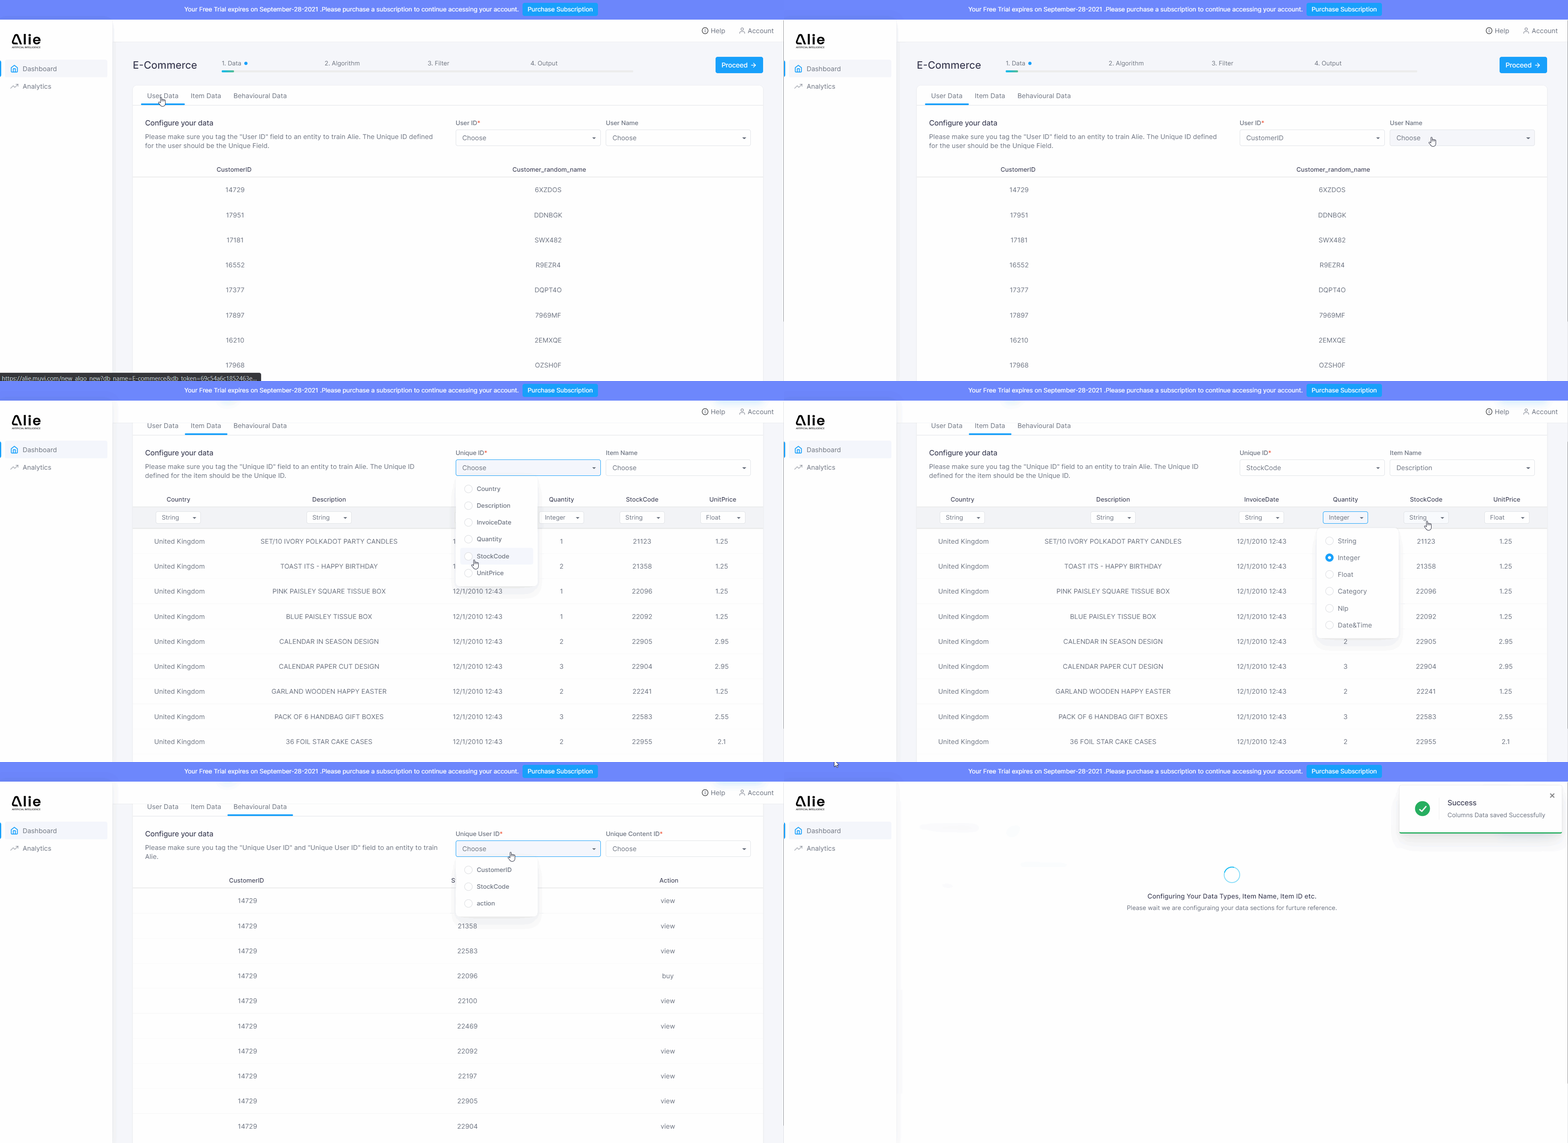
3. Configure the data according to your requirements
Once the data is imported from your website, you now need to configure the data fields and train Alie.
- Go to ‘Project’
- Click on ‘User data’ and add field to ‘User ID’ and ‘User Name’
- Click on ‘Item data’ and add field to ‘Unique ID’ and ‘Item Name’
- You also have the option of adding data types, but it is not mandatory as Alie itself detects the data types. You will get options such as ‘String’, ‘Float’ and ‘Integer’.
- For ‘Behavioral data’, you do not need to do anything as Alie is already trained.
- Click on ‘Proceed’.
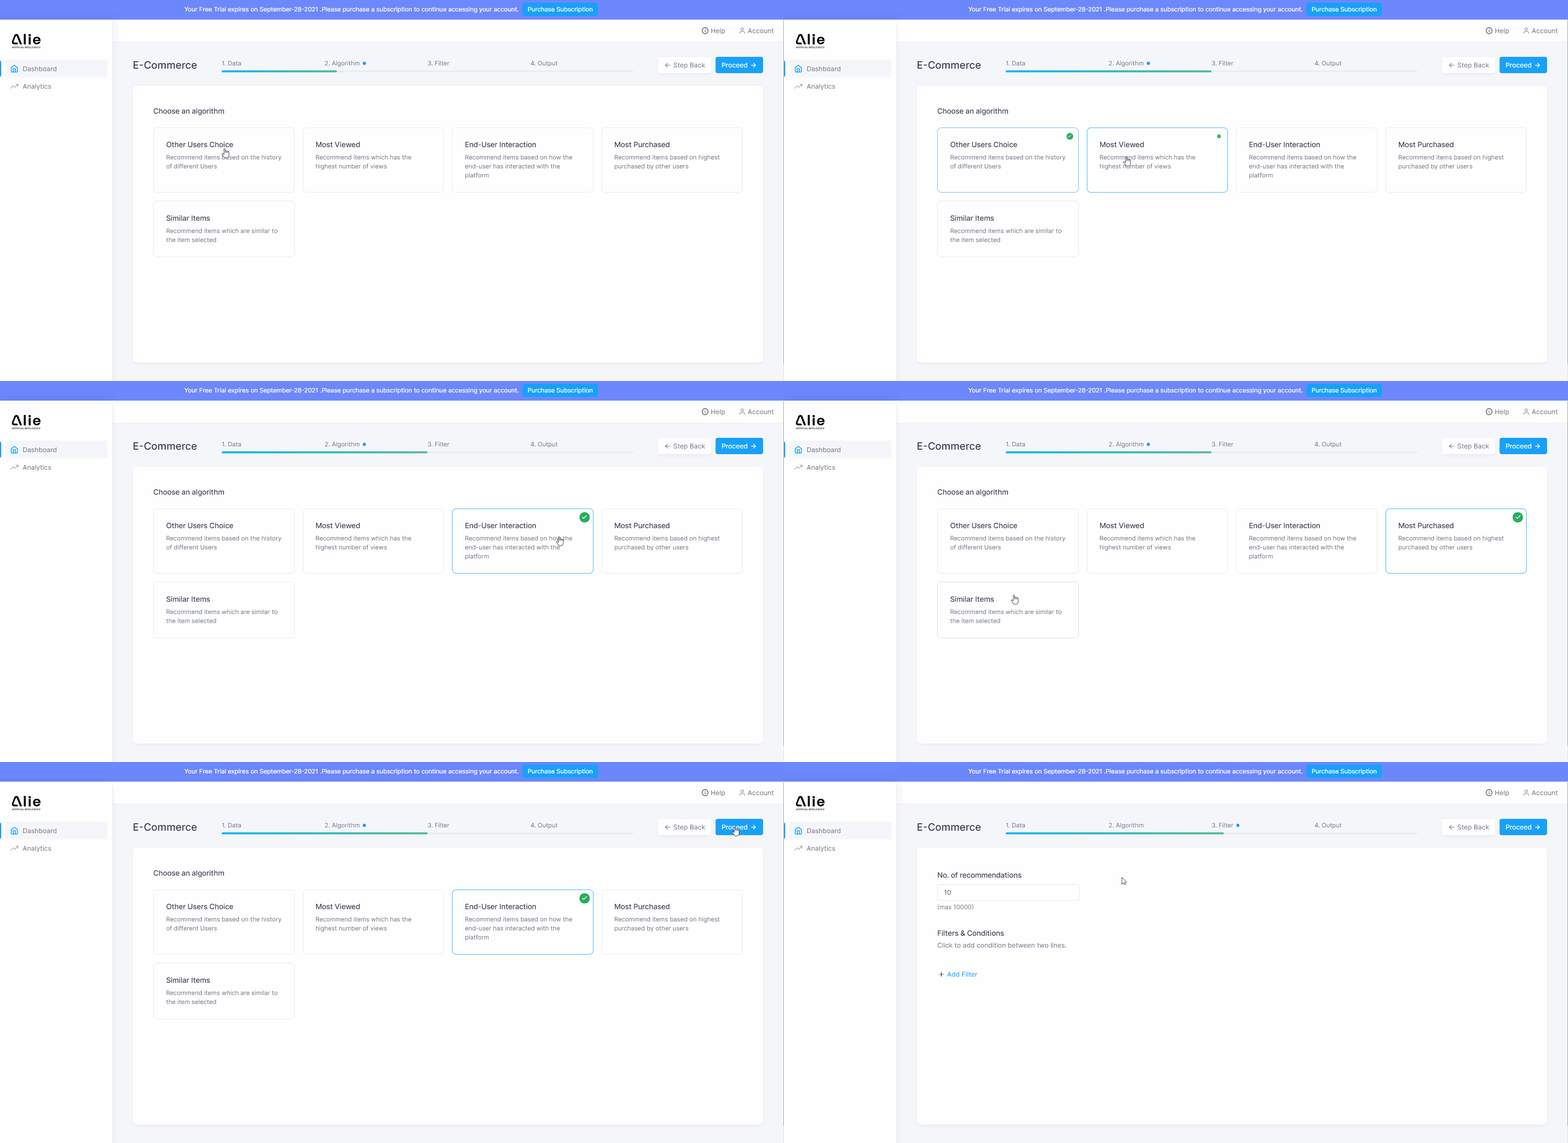
4. Select your preferred algorithms
There are different algorithms available in Alie for you to choose from. List of algorithms –
- Other Users Choice
- Most Viewed
- End-User Interaction
- Cookie Based Recommendation
- Most – Purchased
- Customizable Recommendation
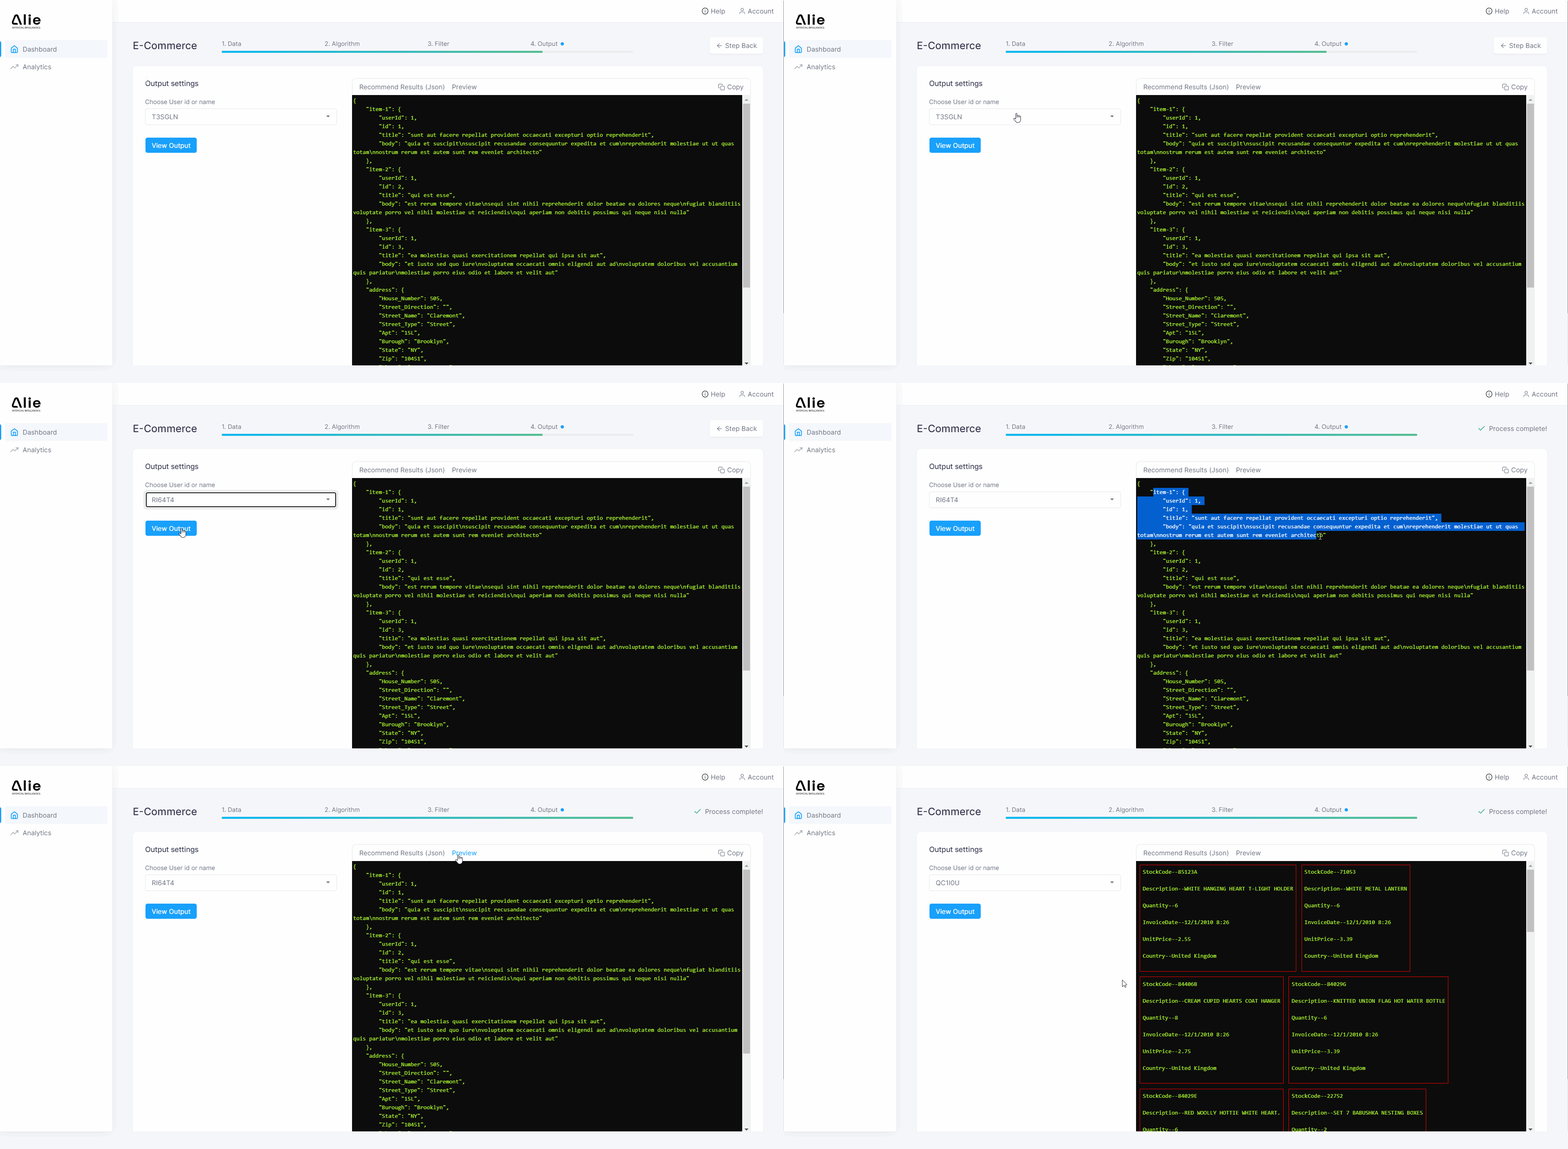
5. See the output in tabular grid or download it in JSON format.
You can see which product is being recommended to which user through the following steps –
- Select the ‘User ID’ or ‘Name’ from the available options in drop down
- Click on ‘View Output’
- See the output in JSON on the right side of the screen
- To see the output in tabular grid structure click on ‘Preview’
With Alie, you save time by not having to wait for months in order to integrate it with your website. Interestingly, if you have any specific requirements for the recommendation engine, Alie’s team will make sure to deliver the same within a reasonable time frame.. The best part? Alie can be integrated with any website, doesn’t matter the hosted platform or programming language such as Php, Java or Python.
Conclusion
One should never rely on a tool that doesn’t offer a free trial for you to experience its advantages and disadvantages. It can lead to a longer waiting period, and there’s a risk that you may face disappointment in the end. Additionally, a robust Recommendation Engine is the need of today’s video streaming industry. We would advise you to not sleep over it and integrate an engine with your website before your customer chooses to shift loyalties. Try the 14-day free trial of Alie – an AI-based recommendation engine that offers multiple algorithms and is as user-friendly as it gets.












Add your comment