We are living in the era of video streaming. With the growth of video streaming, the need for video streaming servers has increased exponentially.
However, due to the technical complexity involved in video streaming, choosing a video streaming server is always a big bet. And if you are planning to develop it from scratch on your own, it becomes even harder.
In this blog, we are going to guide you through the step-by-step process by which you can develop your own video streaming server from scratch. Also, we will discuss why many professional businesses are now choosing professional video servers or relying on a trusted streaming video host instead of self-made video streaming engines. But before that, let’s try to understand the technical nitty-gritty of a video streaming server.
Get rid of technicalities. Leverage the best secure video hosting server used by professionals worldwide! Try Muvi Flex for FREE for 14 days.
What is Video Streaming?
To start understanding a video streaming server, you will have to understand the video streaming process first. When you view any video content from the internet over your computer, smartphone, or smart TV, technically you are streaming a video. But what actually happens in this process?
The video creator first uploads the video into a platform, known as the video hosting platform. Many times, the video gets encoded during this process. Now, this video hosting software is connected to a server. This server is responsible for distributing the video content over a network, which in this case, is the internet.
This entire process in which the video gets encoded, stored in the cloud, distributed through the servers, and played by the players, is called video streaming.
Types of Video Streaming
Ideally, video streaming platform architecture can be of two types, which gives rise to two types of video streaming:
- On-demand Streaming
- Live Streaming
On-Demand Streaming
In on-demand streaming, the admins upload pre-recorded videos to the server. In simple terms, movies, video clips, or anything that is NOT LIVE, comes under on-demand streaming. Since the video is recorded and then uploaded, there is no need for any live video feed in its technical architecture.
As you see here, the raw video that is getting uploaded first gets compressed and encoded. The processed video file is then transferred into the streaming server, which is then distributed to the internet, from where it reaches the end users.
Live Video Streaming or Live Streaming
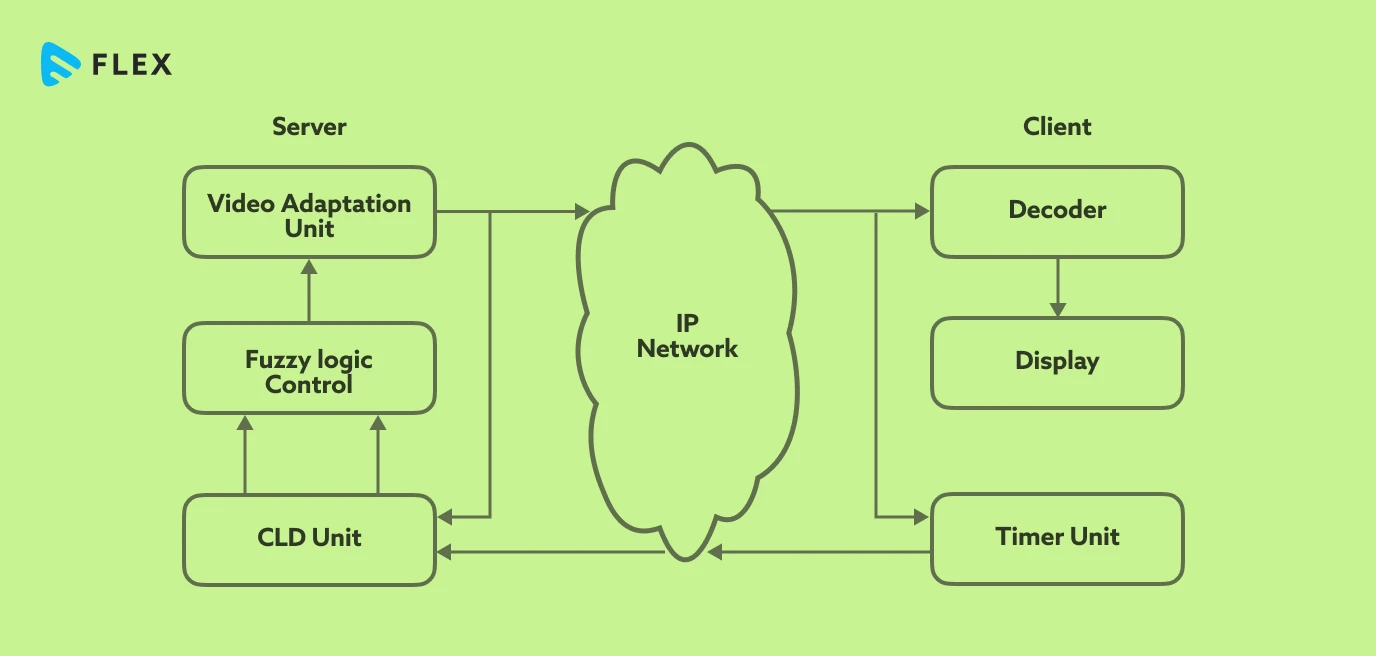
In live video streaming, the feed comes directly from the video source or a video input, which can be a camera. Hence, the live feed received from the video input (source) is first processed by a live-streaming encoder right on the spot, before delivering it to the server.
Also, there are many streaming protocols at play here, the most popular one being the HTTP Live Streaming protocol, known as the HLS protocol.

What is a Video Streaming Server? What Does It Do?
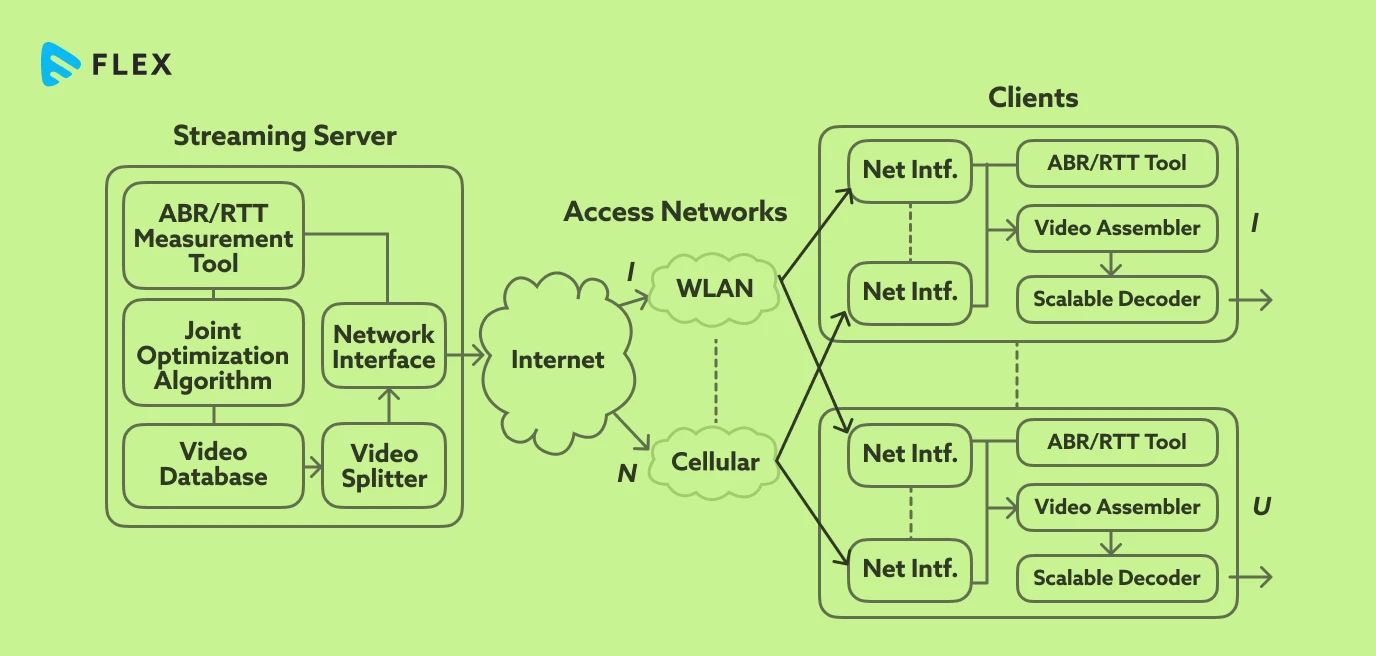
A video streaming server is responsible for distributing the video to the devices connected to the internet. It usually includes multiple elements, including the ABR measurement tool, optimization algorithm, video splitter or transcoder, and network interface. Each of these components has different functionalities, which we will discuss in our next section.
What Is The Function of a Video Streaming Server
The video streaming server is responsible for splitting the video to make it ABR-ready, and then distributing the suitable adaptive bitrate video to the internet, from where it reaches the client devices. Its overall functionality depends on the functions performed by its component, which is discussed below:
- Video Splitter: Video splitter is responsible for splitting the entire video into multiple smaller video segments. This step is extremely crucial for ABR video streaming.
- ABR Measurement Tool and Transcoder: For adaptive bitrate streaming or ABR streaming, multiple video fragments with different bitrates are needed. This component is responsible for measuring the bitrates of the video fragments for this process and transcoding them accordingly.
- Optimization Algorithms: These algorithms optimize the ABR streams by maximizing a joint utility function that rewards increases in average bitrate while penalizing stalls.
Let’s now see how a video streaming server works.
How Does a Video Streaming Server Work?
The video (uploaded or received from the input) goes to the video database, from where it is sent to the video splitter.
The video fragments produced by the video splitter then travel back to the video database, which sends it to the transcoder and ABR unit.
The transcoder and ABR unit prepare adequate numbers of ABR video fragments and send them to the optimization algorithm for final processing.
Finally, the video fragments are sent to the network interface from where they get distributed over the Internet.
Who Needs a Video Streaming Server?
In one line, anyone who uses video streaming for business will need a video streaming server. It is not restricted to streaming platforms only. Even normal businesses that publish videos on their websites will need a streaming server for the same.
eLearning platform, online training platforms, news websites, event organizers, and every online platform publishing videos will need a video server.
Why Would You Need A Video Streaming Server?
Now comes the question, why do you need a video streaming server? Because without a video server, you won’t be able to distribute your videos over the Internet.
A video streaming server acts as a bridge between your system, where you have stored your videos, and your consumer’s system where they will be ultimately played.
Once you have a streaming server, it becomes very easy to distribute your videos online, from where anyone can stream them. Also, you can monetize your videos by inserting ads in between your videos, via Server Side Ad Insertion (SSAI).
If you are using a Content Distribution Network, which is nothing but a cluster of thousands of globally distributed cloud servers, you can achieve unmatched scalability and ultra-low latency streaming with minimal buffering.
Once you connect a CDN, you can very easily implement a DRM too, which will help you protect your video content from any form of piracy attempts and copyright infringements.
Important Features to Look For In Video Streaming Servers
Some of the most important features to look for in any video streaming server include:
- Multi-format support for videos
- Secured video streaming
- Scalability
- Cross-platform compatibility
- Geo-restrictions
- Ad-insertion (monetization)
Let’s discuss them one by one.
Multi-Format Support
Nowadays, video files can have multiple formats. And manually converting each of them is a bit difficult. So, you expect your servers to accept multiple video formats, and then convert the video format during the encoding process. It makes your job effortless as a video curator.
Secured Video Streaming
We are living in the era of video piracy. Hence, security in video streaming servers is extremely important, as pirates will often try to steal data. Multi-DRM encryption and forensic watermarking are some ways to ensure the security of your videos.
Scalability
You don’t know how many users will view your videos simultaneously. A scalable server helps you sail through the peak of your viewership without any buffering or crash. CDNs are extremely crucial for enhancing the scalability of your server.
Cross-Platform Compatibility
Nowadays, users stream videos via multiple devices, including smartphones, laptops, smart TVs, and more. Hence, your server, and most importantly your player, must be compatible with all the devices and OS ecosystems.
Geo-Restriction
Geo-restriction helps you decide and control the geographical locations in which your content can be viewed. Hence, you can publish localized content catering to a specific geography using this feature.
Steps To Create Your Own Video Streaming Server
Developing your video streaming server from scratch is not easy, and you will have to set up multiple components to finally achieve your target. Broadly speaking, creating your own video streaming server will include the following five steps:
- Setting up a web server.
- Set up your own streaming platform.
- Set up your CDN.
- Enable Muli-DRM.
- Configure a media player.
Step 1 – Set Up Your Web Server
In the first step, you need to set up a web server. For this, just follow the below-given steps:
- Choose a system with the following configurations:
- 1.5GB DDR RAM
- 60GB hard drive (IDE)
- 3 Ethernet cards
- A powerful CPU
- Install Linux as an Operating System – Ubuntu Linux 8.04.
- Set up remote desktop access by going to System->Preferences->Remote Desktop.
- Install FTP and configure it. Once done, configure and activate the FTP server.
- Install HTTP or HTTPS support (whichever you prefer).
Step 2 – Set Up Your Streaming Platform
In the next step, you will need a domain to test your server. That is why, it is time to set up your streaming platform at this stage. You can develop and create a video streaming website with your own domain from scratch, or take the help of no-code streaming platform builders like Muvi One.
Bonus Tips: Develop your own streaming platform in minutes, without coding!
Using Muvi One, you can develop your own streaming platform with 1000+ industry-leading features. From CDN to DRM, and from monetization to video player, you get everything out of the box! Click here to get started.
Once you have your own streaming platform and domain, you can test your server using that domain. Here, the streaming platform must accompany an encoder, that will be able to process the videos that you upload on your platform.
Step 3 – Set Up Your CDN
The physical server that we built in Step 1 might not be able to handle multiple concurrent streams. To make your platform scalable, you will need a CDN.
Now what is CDN? CDN is a group of cloud servers that are distributed across the globe. Hence, by using CDN, you can actually have multiple servers running the same content, instead of just one physical server which cannot move from one place to another.
So, you can either set up your own cdn video delivery using software tools like Nginx or enable third-party CDNs like AWS CloudFront.
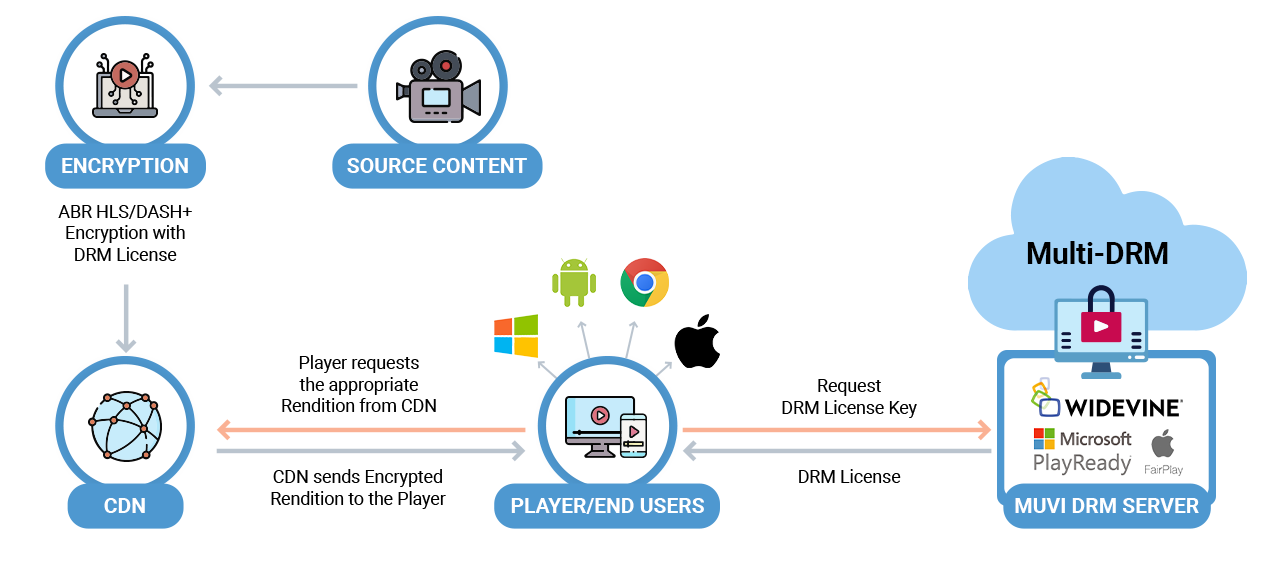
Step 4 – Enable DRM
Video security is extremely important, and DRM is the best solution for the same. You can enable DRM security by setting up DRM from multiple DRM providers like Widevine, Microsoft PlayReady, and Apple FairPlay.
Step 5 – Set Up Your Media Player
In the final setup, you will need to set up an HLS video player or compatible media player to play the video on the end user’s device. Multiple player SDKs are nowadays available in the market, with Muvi Player SDKs being amongst the most efficient ones.
Bonus Tips: Deliver Cutting-Edge Video Experiences with Muvi Player SDKs!
Try Muvi Player SDKs – the developer-friendly, easy-to-handle, easy-to-integrate, cross-platform compatible, highly customizable HTML5 video player SDKs that let you deliver smooth video streaming experiences on every screen.
Pros and Cons of a Self-Made Video Streaming Server
A self-made video streaming server has both pros and cons. Let’s take you through some of them.
Pros
- The self-made servers are easy to customize and manage.
- You can try out multiple features as you decide which features you need and which ones you don’t.
- You can easily monetize your videos by placing ads.
- You enjoy enhanced control with greater privacy.
Cons
- Limited scalability.
- Implementing CDN and DRM at a large scale into your self-made server would be difficult.
Buy vs Build Your Own Server: Which One Should You Choose
If you have both options available, then I would recommend buying a professional server, as a self-made server often lacks scalability, leading to buffering. It is a crucial performance drawback that must be avoided.
Also, piracy attempts might be more on a self-made server as some of those might not have a well-implemented DRM. Implementing DRMs is technically challenging, and implementing multi-DRMs is even more difficult.
Also, the technical support that you get when you choose a professional server is unmatched. You won’t get such support if you are working on a self-made server, and hence at times, you might get stuck.
Wrapping Up
In this blog, we guided you through the step-by-step process of developing your own streaming server. But if you need highly efficient performance, then you must choose a professional video streaming server and hosting solution, like Muvi Flex.
With Muvi Flex, you get uninterrupted video streaming which is a class apart in quality, speed, and scalability. Along with the server and hosting solution, you get video CDN hosting, built-in multi-DRM security, and a fully customizable HTML5 video player out of the box. Hence, you don’t have to worry about anything else.
Core Features of Muvi Flex
Our USPs
- Unlimited Features
- Unlimited Customization
- Unlimited Support
And the best part is, you can try Muvi Flex free for 14 days, and you don’t have to share any credit card details! So, why wait? Sign up to start your 14-day free trial today!


Add your comment