Written by: Mousumi Rana
Mousumi is a Content Marketer for Muvi. She is passionate about writing corporate blogs, articles, case studies, and marketing collaterals. When not working, she loves to dance, gym, and explore new places.
Hey folks! It’s our “Whiteboard Wednesday” Day and we are back with another interesting blog to get you in the fast track lane in your streaming game during these self-quarantine times. The ongoing social distancing regime has fostered the … Continue reading

Hey folks! It’s our “Whiteboard Wednesday” Day and we are back with another interesting blog to get you in the fast track lane in your streaming game during these self-quarantine times. The ongoing social distancing regime has fostered the importance of streaming businesses now more than ever. And when we are talking about fast tracking the pace of your streaming business, easy content upload is one of the key things to be taken care of.
In this blog, we will guide you to upload your video content by using different methods.
So, let’s get started…
When you want to upload video content from your computer to your video library,you need to go to the “Video Library” under “Manage Content” in your Muvi CMS. You have to then click on “Upload Video” and “From Computer” sequentially. You can then proceed to select “Upload File” to get your chosen video content uploaded from the computer. While following the process, just keep in mind that maximum size for a single content file has to be 48 GB. However, you can upload unlimited numbers of videos to your video library.
While your video gets uploaded, the status window will help you to keep a check on the upload information and track the process through the progress bar. Once the uploading is complete, you can view the content in the Video Library.
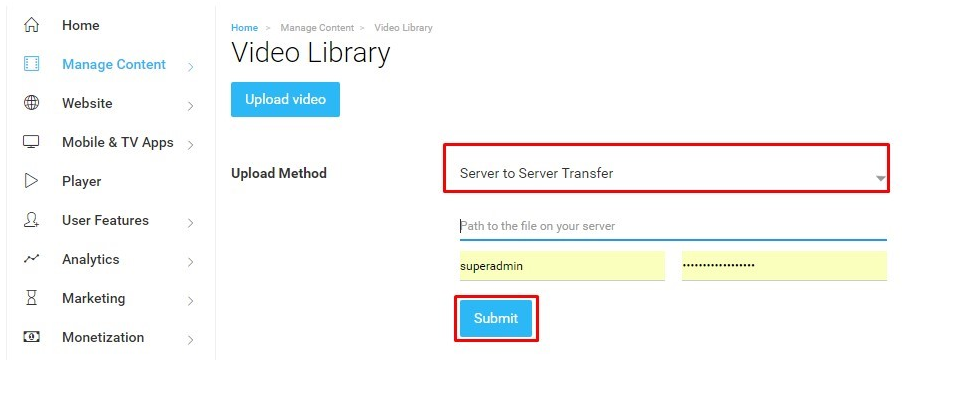
With Muvi CMS, it is very convenient to upload video content through Server-To-Server transfer. All you have to do is, click on the “Server to Server Transfer” option from the drop-down list. You can then add the file path on your server in the corresponding field. Proceed further with adding your User Name and Password in the respective fields and then click on the “Submit” button.
As this method supports single video file upload, you can repeat the process for every video file when you have multiple content.
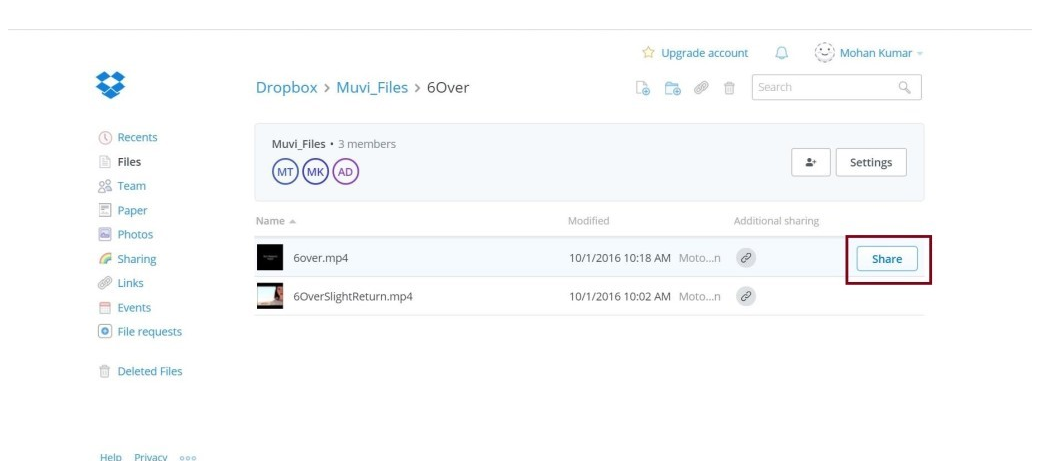
In case you have all your videos uploaded in your Dropbox account, you can use this method to upload them directly to Muvi CMS. You just login to your Dropbox account and choose “Files” to open all your uploaded video content. Check for the “Share” menu at the right side pointing to your video.
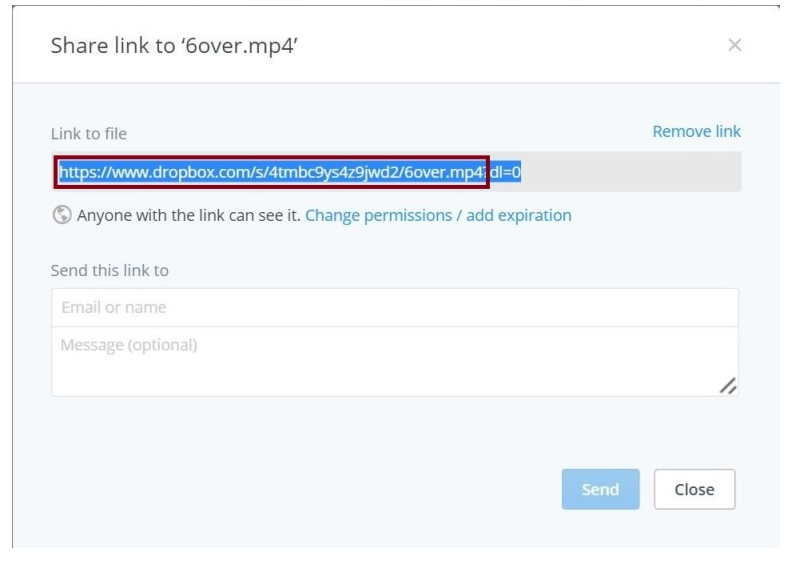
Once you select “Share”, you will have a pop up window on your screen.
Proceed by copying the URL of your video content.
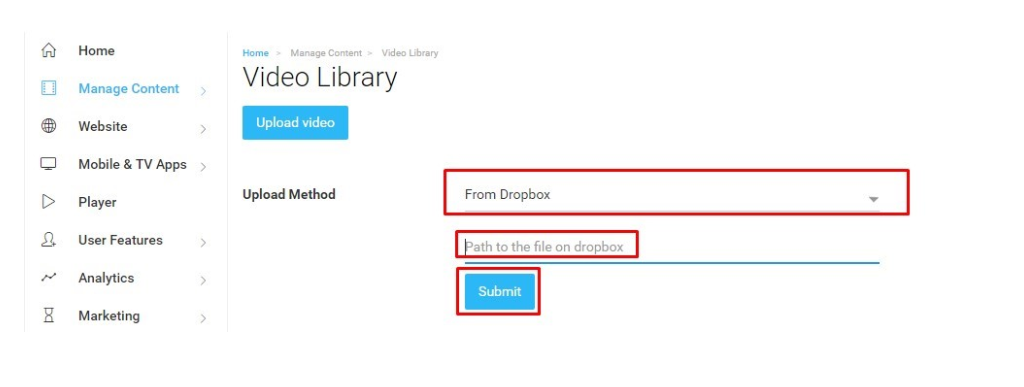
Then choose the “From Dropbox” option from the drop down list in the Muvi CMS. Paste the copied URL from Dropbox till the extension of the video format in the field “Path to the file on Dropbox”.
Delete all the other text after the video format and then click on Submit for starting the video upload.
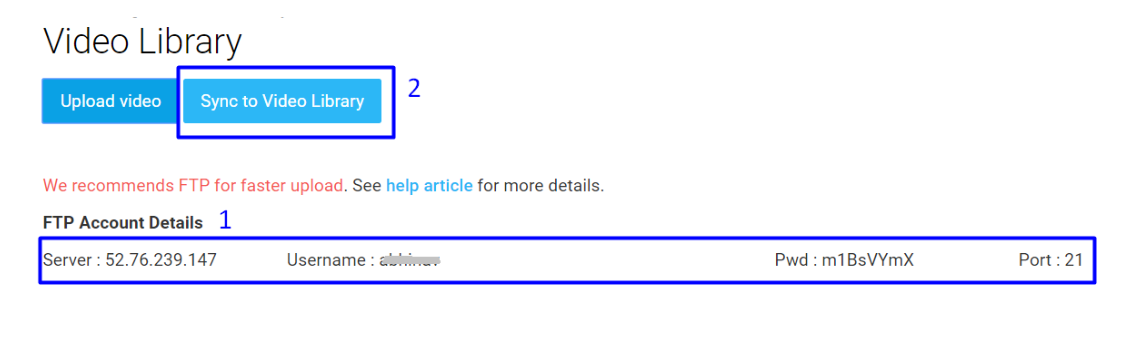
When choosing this method, we conventionally use the FTP client for uploading video content to the Video library of Muvi. Currently, we are using FTPS(FTP over SSL) which is basically a secured version of FTP.
To proceed, just login to FTP account along with your FTP account details that are provided to you in the CMS. Install FileZilla and then login to it using the FTP details. You can then start uploading your video content after connecting to the FTP account. Click on “Sync to Video Library” present on the video library page. You will have all your video files uploaded automatically to the “Video Library”.
This method is suitable for uploading bulk videos to your video library. You also get the advantage of connecting to this account from multiple computers at the same time for uploading your video content.
Here are certain points that you need to Note while using this method:
If you happen to have video content on your Amazon S3 Server, you can share all these content too. Here, uploading bulk videos to your Video Library is very convenient.
You can do so by using 2 methods:
Points to remember while using this method:
For more details regarding this, check out our Help Article here.
So, there you go! Follow these simple steps and get your videos uploaded in no time!
We would love to have you share your thoughts in our comment section below. Don’t forget to tag @Muvi with #WhiteboardWednesday on Twitter and share your views.
See you in our next Whiteboard Wednesday segment. Till then Happy Streaming with Muvi!
Written by: Mousumi Rana
Mousumi is a Content Marketer for Muvi. She is passionate about writing corporate blogs, articles, case studies, and marketing collaterals. When not working, she loves to dance, gym, and explore new places.

One Platform, Infinite Streaming Possibilities
Live & On-Demand, Audio & Video, Mobile & TV Apps, Player, and Monetization
Start free trialNo credit card required.


Add your comment