Let’s face it – nobody likes watching live videos that keep either buffering, lagging, or is low in resolution. These quality issues can be extremely frustrating and can leave viewers with a poor view about the brand. For taking your viewer experience to the next level, improving the quality of your live streams is imperative. To help you create high-quality live streams, this blog elaborately discusses all the technicalities you need to make to produce the best live video content.
Why is Live Streaming Quality Important?
One of the most common issues broadcasters have is to create a positive viewer experience. The quality of a live stream directly impacts viewer experience. When a live stream suffers from quality issues such as buffering, pixelated images, or delays, it impacts the viewer experience heavily and can all lead to viewers tuning out, which has implications for your business. This reduces the positive impact of your content, regardless of the information contained. Since live stream quality is so important to the viewer, it should be important to broadcasters, as well.
Research shows that professional broadcasters risk losing up to 25% of their revenue when the quality of their streams is less than desirable. While the task to improve live streaming quality might appear daunting and technical, taking the 10 steps below is well worth the effort.
Tips to Improve Live Streaming Quality
Choosing the Right Equipment
Using average grade-cameras and microphone will not bring forth quality streams- it will only result in average video quality. While using average-grade cameras may work well for video calls and meetings, if you’re looking to present professional live streams, you’re going to need to invest in some quality equipment to instantly improve your live stream results.
You have to invest in professional live streaming equipment to provide a top-notch user experience since if your original recording is of poor quality, there is nothing you can do to improve it. That’s why using a good quality camera will provide good quality video right at the time of video capture.
Also Read: How to Set up Multi Camera Live Streaming: A Detailed Guide
Adjust Light Settings
Low light levels are a strict no-no for creating quality live streams, especially if you are shooting indoors. Live streaming in low-light conditions makes it difficult for viewers to watch. Use a well-lit room for streaming, either use natural light or by use artificial lights to illuminate the subject of the live stream. One tip here is to constantly refer to how this lighting comes across on screen and adjust accordingly, making sure the subject is evenly lit. Choose a place where you will have control over the lighting, ambient sound and interruptions. Set up a clean, neutral background with good lighting. This helps your audience to concentrate completely. Avoid dark rooms, low ceilings and sitting in front of a window against the light.
Also Read: Live Streaming to a Remote Audience
Choose the Right Video Platform
Choosing a professional live streaming platform goes a long way to improve live streaming quality and a live video platform is equipped with features that help optimize your live video quality. Also an online live streaming platform provides other tools for monetization, security, and so on. What’s more, these online video platforms can be used to multi stream to several different destinations at once, such as YouTube, Facebook, or a website.
There are certain features to look for that will help you maintain high-quality streams.
- Adaptive bitrate streaming to provide optimized viewing experience based on the internet connectivity of the viewer.
- CDN or a content delivery network: How does the OVP distribute content?
- Resolution: Look for a live streaming platform that allows you to broadcast in full 1080P HD.
- 24 X 7 Support: Choose a video service provider that offers 24/7 customer support to help you troubleshoot your live streaming issues.
Use High Speed Internet Connection
Your internet connection is crucial to improve live streaming quality. Low internet speeds can lead to unnecessary buffering or frozen videos, which often equates to lost viewers and less engagement. To broadcast your live streams, you will be needing a steady internet connection with good upload speed. Ideal upload speed is 1MB per second and greater. It is always a good idea to test your upload speed for live streaming before you start to actually live stream.
There are many tools available on the internet for this purpose. The easiest and the most popular way is to check it out online at speedtest.net. The results provided will give you a rough estimate of your upload and download speeds provided by your internet service provider.
For live streaming, the video file size depends on the quality of the content. We recommend an upload speed of:
- 2-3 Mbps for 480p (minimum 600Kbps).
- 5-6 Mps for 720p (minimum 1.75 Mbps)
- 10-12 Mbps for 1080p (minimum 3 Mbps)
Take a Look at the Video Bitrate
A higher video bitrate every second transmits more information and pixels at a higher speed. Using adaptive bitrate streaming allows you to use more than one bitrate to transmit multiple streams, which helps viewers with different internet bandwidths watch the video at the highest possible quality. Even if viewer’s networks have particularly slow internet speeds, adaptive streaming helps viewers watch a lower quality but fully functional live stream.
Adjust your Encoder Settings
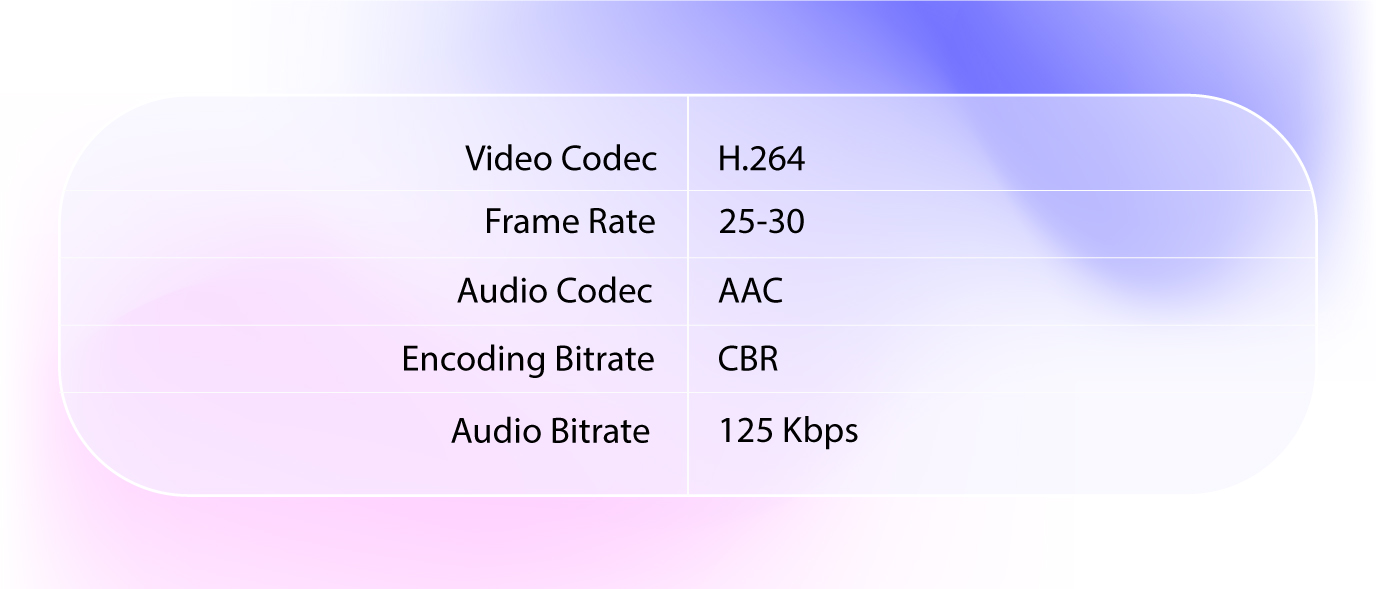
A software or hardware encoder is a tool that converts your live video into digitally compatible formats that can be streamed over the internet. When live streaming, your video content is compressed by an encoder to match your settings, thereby affecting your video quality in terms of resolution, bitrate, and size. Therefore, optimizing your encoder settings has a lot to do with the quality of your live stream.
Here are our recommended live encoder settings:
Choose Optimal Resolution
The “highest resolution” does not equal the “best resolution” when it comes to live streaming. You want a resolution that provides a clear image without being too big to transmit without lagging. Professional broadcasters typically opt for 1280 x 720 pixels (720p) or 1920 x 1080 pixels (1080p).
For more information on video resolution, read blog SD, HD and 4K – Streaming Video Resolutions Explained
Wrapping Up,
Hope we have been able to guide you on how easy it is to stream high-quality live content. It all starts with practice, the right platform, settings, and setup. When you are planning to invest in a powerful streaming solution, it makes sense to try before you buy.
Driven by adaptive media and chunked delivery concept, Muvi Live streamlines encoding and improving live streaming quality content and delivery curbing bandwidth consumption while ensuring a superior user experience.
Interested in checking out Muvi Live? Try our 14-Day Free Trial!








Add your comment