In the modern era of education, Learning Management Systems have become a basic necessity. Whether it is digital learning or classroom learning, LMS has its own advantages in both scenarios. And this escalation of LMS is not limited to the education field only. Recent statistics say that 98% of the large companies in the US have been using LMS since 2021. And this includes corporate companies too!
But, when it comes to developing an LMS, there is still a lot of skill gap in the market. Most companies in today’s times buy LMS software like eduflow from a professional LMS development company, and then they customize it according to their own needs.
But this process often proves to be full of hiccups. Firstly, the educational institutes and eLearning companies need to remain completely dependent on the Tech Team of the LMS providers. Secondly, many times these service providers charge a hidden cost for features, which makes the platform more expensive.
That is why, it is now time to develop your own LMS Platform, which will be fully customized to meet your specific needs. Wondering how you can do so? This blog is here to discuss how you can develop your own LMS platform without writing a single line of code! So, let’s begin!
How MUVI Can Be Used To Develop A Learning Management System?
Developing your own Learning Management System using MUVI is much easier than you would have imagined.
Just follow the steps given below and your LMS will be ready in a jiffy!
Sign Up With Muvi
In the first step, you need to sign up with MUVI. You can do so by clicking on the “Free Trial” button given on the right corner of our website. You can also sign up using this link.
Once your free trial account gets activated, log in to your CMS dashboard to proceed to the next step. Now, you will have to choose a template for your platform. Please follow the steps given below to do so:
- Go to the Website menu of your CMS dashboard, go to “Templates”, then click on “Manage Templates”
- The list of all the templates will appear on your screen. Please activate any one of the “Revo” or “Modern” templates for your platform, because only these two templates allow you to add sub-users which is important for developing your LMS.
Activate the Sub-User Account for your Faculty members
In order to enable your faculty members and students to upload their content and interact with each other, you need to add them as sub-user. You can start this process by adding the faculty members as your sub-users, or parent users. Then, the faculty members will add the students as their sub-users, or child users.
You can enable sub-accounts for your faculty members using the steps given below:
- Ask your faculty members to subscribe to all content subscription plans of your platform. Because only all content subscribers can be allowed to add sub-accounts.
- After the faculty members join you as all content subscribers, you need to enable sub-accounts for them.
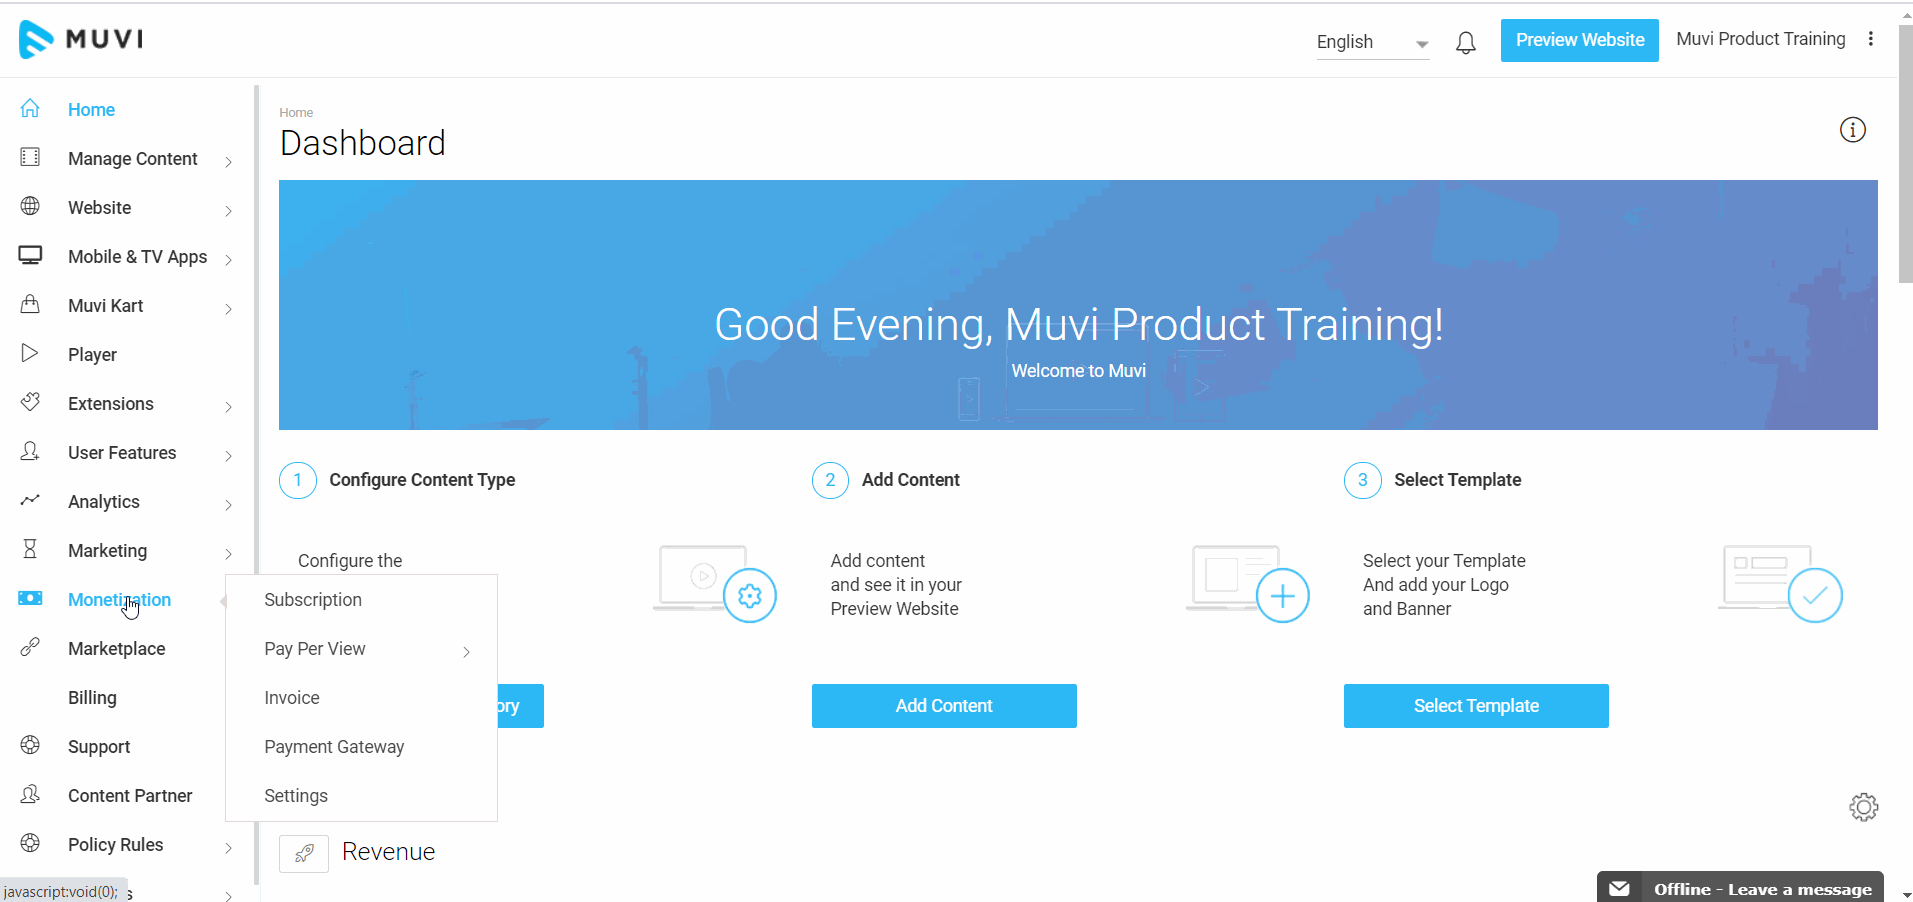
- To enable sub-user accounts for your faculty members, go to “Monetization” → “Subscription” in the CMS.
- Click on “Enable-Sub Accounts” on the right-hand side of a subscription plan (for which you want to enable this option).
- When prompted, click on “Yes” to enable.
Your faculty members can now add their students as child members.
Faculty Members Create End-User Accounts For Their Students
Now, your faculty members should add their students as sub-users or child-users. This will allow the students to watch the content posted by the faculty members.
The teachers can add the student accounts by following the steps given below:
- The teachers should log in to their MUVI account, and go to “Profile” → “Manage Users”.
- Under “Manage Sub-User”, click on “Add Sub-User”.
- Type the “Name”, “Email Address”, and “Password” of the student who you want to add. Please remember that this password will be used by your student to login into their account, that is why make sure to keep unique passwords for each student.
- After filling in all the details, click on “Add New User”. The student will be added as a sub-user. Now keep repeating this process to add more students as sub-users.
Enable UGC Feature
User Generated Content (UGC) feature enables your teachers to upload documents and content into the platform. In addition, even the students can upload their questions, answer scripts, and project files whenever necessary.
In order to allow your teachers and students to add their content, you need to enable the UGC feature from your dashboard, which you can do by following the steps given below:
- Go to “Manage Content” and click on “Settings” in your CMS
- Under “User Generated Content” select the checkbox for “Enable UGC (user-generated content), and click on “Save”
But sometimes, the students can post irrelevant content too. So, if you want to first review the content uploaded by your students and then give your approval to publish it, you can enable the review UGC feature. To do so, select the checkbox for “Review UGC (user-generated content)”.
After enabling the content approval feature, the content posted by your students will not get published on the platform until and unless you approve them.
Enable Monetization Models
In order to collect tuition fees from your students, you need to enable the monetization models. You can use the different types of monetization models for different purposes, like
- PPV: Pay-per-view monetization can be used for videos with a limitation on the number of views. You can also use it for videos that can be accessed for a limited time period like for a month or a year. In a more logical way, you can prepare a bundle of videos on a specific topic, and sell it to your students in the form of a course.
- Coupons and Vouchers: Coupons and vouchers can be used for paid classes, textual content, recorded lectures, or even live classes. It can be used to present a demo class as well.
- Ad-Supported Monetization: This monetization model can be used to deliver free courses backed by advertisements.
- Subscription: Users with subscriptions will be able to access most of the videos available on your platform for the subscribed time period. You can use this monetization model to deliver access to your entire course database for a specific time like one year.
Advanced Analytics
At MUVI, you can view all the analytics related to your students, like how many videos they watched, how many audios they listened to, how many files they opened, and how much bandwidth they spent in your platform, using our in-built advanced analytics feature. You just need to go to “Analytics” and then click on “Content” in the CMS.
How It Works?
So, first, you will have to add your faculty members as subscribers to your platform. Then, your faculty members will add the students using the Sub-User Account feature.
Once the accounts are created, it’s now time to upload your first lesson!
To add video content, you need to follow the steps given below:
- Go to “Manage Content”, and click on “Content Library” in the CMS.
- On the “Content Library”, click on the “Add Content” button to add new content.
You can upload Single-part VOD content when you need to add a single standalone video. But, in case you need to add multiple videos on the same topic, you will have to choose multipart video content. You can read the entire process in detail from our help article.
If you want to add MCQ questions in the middle of your videos, you can do so using CTA cards. You can read the process of adding CTA Poll cards to your videos here.
If you want to conduct live lessons for your students, you can do so very easily with MUVI. Also, you can broadcast zoom meetings too!
So, when a student will join any course offered by any tutor, they will be able to see the course to which they will subscribe. In order to prepare the courses, you can use the PPV Bundles monetization scheme, through which you can create a bundle of videos and materials together, and your student will be able to pay for it to see the videos and course materials.
Benefits of Using MUVI for your LMS Platform
Using MUVI as an LMS has many advantages that are rare to find in any other LMS. Let’s take you through some of those benefits.
UGC Can Be Used for Assessment Purposes
Apart from the CTA cards discussed above, you can use our User Generated Content (UGC) feature for accessing your students. In this method, the teacher will upload the question paper through their account, and the students will be given some time to prepare their answers. Once the time period is over, they will upload the pdf file of their answer scripts in the form of UGC content from their child accounts.
The teacher will review the answers, and the best answer script will get approved. In this way, all the students will be able to view the best answers and correct their mistakes.
Ebooks can be Uploaded
Muvi allows you to upload textual content too, just like video or audio content. So, you can use this feature to upload ebooks and study materials for your courses. The students who will have access to that course can use the ebooks and study materials.
CTA Poll cards can be used for MCQ assessment in the middle of lesson videos
Interactive learning is the key to success for digital learning. That is why, most of the tutors prefer to take a quick assessment at the beginning, end, or middle of each lesson. And CTA Poll cards make the task all the easier for you.
These MCQ questions help test the attentiveness of the students and let you know their pace of learning and understanding, which you can use to modify your future courses.
Muvi Kart can be used for selling textbooks
Many times, the students come to the teacher to ask for the correct textbooks. MUVI Kart allows you to not only recommend but sell textbooks to your students. In fact, you can link the textbooks with appropriate video lectures, so that your students can find the link to buying textbooks just below the lecture video.
Analytics can be used for recording attendance and tracking the activities of the students
MUVI offers you advanced analytics that can be used for recording the activities of your students. It not only gives you the idea of how attentive they are, but you can also realize which lesson is proving difficult for them, as they visit the videos multiple times and try to understand the concepts.
With DVR Control students can pause, reverse, and play even the live tutorials
The use of DVR lets your students adjust the pace of your live tutorials. They can pause and play the live lessons, to visit the sections they might have missed or did not understand on the first go.
Also, you can analyze the lessons that they have completed and hence get an idea of their pace of learning.
This also paves to adaptive learning, as the courses are flexible enough to adjust according to the student’s understanding. The students will no longer have to worry about the fast pace of any live tutorial.
Allows Subtitles in Multiple Languages
By adding subtitles in multiple languages, you can localize the content of your courses for students who are non-native speakers of the English language. Thus you can expand your student base by globalizing your courses.
Alie for Course Recommendation
Alie is an in-built recommendation engine of ours, which recommends appropriate courses, textbooks, and study materials to your students depending on their nature of browsing.
Wrapping Up
With MUVI, you can have a complete eLearning platform and Learning Management System that will work as a depository of your course videos and materials, a store for selling recommended textbooks, recommendation engines for recommending appropriate courses to your students, a live tutorial platform where your students can pause and play, and interact with their tutors, and so much more!
And do you know what is the best part? This platform will be completely white-labeled, bearing your own logo and brand identity. And…you don’t need to write even a single line of code to develop the platform! Wanna try? Sign up to start your 14-day free trial today!


Add your comment