Live streamers and broadcasters have started to realize that launching their own live streaming website is the only way to secure the long-term future of their business. It sure is possible to use YouTube, Twitch, Facebook, and other free third-party social media platforms to live stream and attract an audience. However, setting up your own live streaming website and integrating with a live streaming platform looks more professional. Additionally, it gives you more control, enables content security and helps in building and maintaining your brand image in a standardized format. In the next few minutes, you will learn why and how it’s easy to create and launch your live streaming website.
Why Create a Live Streaming Website?
A live streaming platform is beneficial for businesses due to several reasons:
- In today’s web-focused world, websites are a crucial way of letting customers access and evaluate businesses. A professional live streaming website thus communicates brand identity in an effective way.
- The content created via live streaming is unique and generally attracts an engaging audience. The immediate and unpredictable nature of live video on your website draws more attention and compels viewers to interact with the content.
- Having a live streaming website acts as a great testing ground for ideas, enabling you to judge a concept based on viewership, engagement, and feedback during the live stream.
Live Streaming Statistics
1. 55% of enterprises use live video for their company or division-wide broadcasts.
2. 29% professionals stream or broadcast live video in their organization daily.
3. The live streaming industry is expected to be valued at 184.27 billion USD by 2027. (Tech Jury, 2020)
4. According to Nielsen’s U.S. Video 360 Report, 42% of the population in the U.S. have now live-streamed online content
5. 82% of viewers say they prefer seeing a live stream rather than a brand’s social posts. (Tech Jury, 2020)
For more statistics on live streams, read our blog 30 Live Streaming Stats for 2022 every Video Marketer should Know.
How to Build a Live Streaming Website: Step-by-Step Guide
1. Invest in Live Streaming Equipment
The first step towards launching a live streaming website is capturing your live streams. Since you would be live streaming from your studio, outdoors or right from the comfort of your bedroom, investing in professional-grade cameras and mic would be the first in agenda.. Professionals can also use 4K resolution camcorders for better quality. It all depends on your budget and streaming goals. Webinars, training sessions, and other simple broadcasts are fine with ordinary camera setup, but when live streaming more advanced broadcasts like sports or travelogues you need professional setups with TV-grade equipment. For that you would require some streaming equipment like:
- High-quality video camera (HD or 4K)
- A microphone
- Proper lighting equipment (if shooting under low light conditions)
- Portable Wi-Fi Device or the Internet
- A tripod
- Audio mixer
One of the major concerns while live streaming is a good quality microphone as sometimes, audio gets ignored due to more focus on video quality. The best high-quality audio comes from external microphones worn on the lapel, so make sure you invest in good audio equipment.
2. Choose an Encoding Software
Next step for building a live streaming website is choosing an encoding software. Most cameras are designed to record, rather than to live stream. Making it imperative for live streamers to invest in a software encoder that works with the camera of your choice.
Needless to say, encoding changes your video from a raw format to a compressed, digitized version that is optimized for transmission over the web. This ensures that your viewers can access your web streaming video without facing any issue.
While there are many encoders available in the market, the safest bet would be OBS Studio as it is a good option for broadcasters who are new to the game because it is easy to use and free.
To Live Stream with OBS, you have to first download and install OBS in your system. To download OBS, click here.
- Open OBS Studio and go to the Sources section, click + to add a new source.
- Select “Select Video Capture Device” from the list and click on “OK” to add the capture device.
- Navigate to “File” –>” Settings” –>” Stream” and from the drop-down, select “Custom”.
- Type the “Server” and “Stream Key” obtained from Muvi Live Server
- Click on “Apply” and “OK”.
- Click on “Start Streaming” on the bottom right corner of OBS to start the live stream
For more details on encoders, read our blog, Top 4 Live Streaming Encoders: All you Need to Know
3. Choose a Live Streaming Platform
The next step towards building your customizable live streaming website is to choose a professional live streaming video hosting platform. Opting for free video hosting sites like YouTube would be fairly light on your pocket but these B2C video hosting websites cannot help you in creating your business name in the long run. Also, such platforms contain complex guidelines and policies, which, if you fail to adhere to, would result in the demonetization of your video.
You would require a professional online video platform like Muvi to help promote your brand name, market and monetize your live video content. Features like look and feel customization of the front end of the video streaming service, adaptive bitrate streaming, bulk upload, cloud transcoding, DRM, etc. are features only an enterprise-grade OVP will give you.
Additionally, professional live streaming platforms like Muvi are equipped with better live streaming video features ensuring better video branding, video monetization, privacy, recording, and more.
Before starting out, You’ll want to test out your streaming setup before you broadcast.. Here is our OBS Studio guide to help you live stream seamlessly.
4. Select Template for Creating a Stunning Live Streaming Website
The first step towards creating a video streaming website is to create a spectacular homepage that showcases all your live streams. For that, after you sign up with Muvi, you can select a template from our stunning array. Simple! You just need to log in to Muvi Dashboard or the CMS menu and then go to Website –>Templates –>Manage Template.
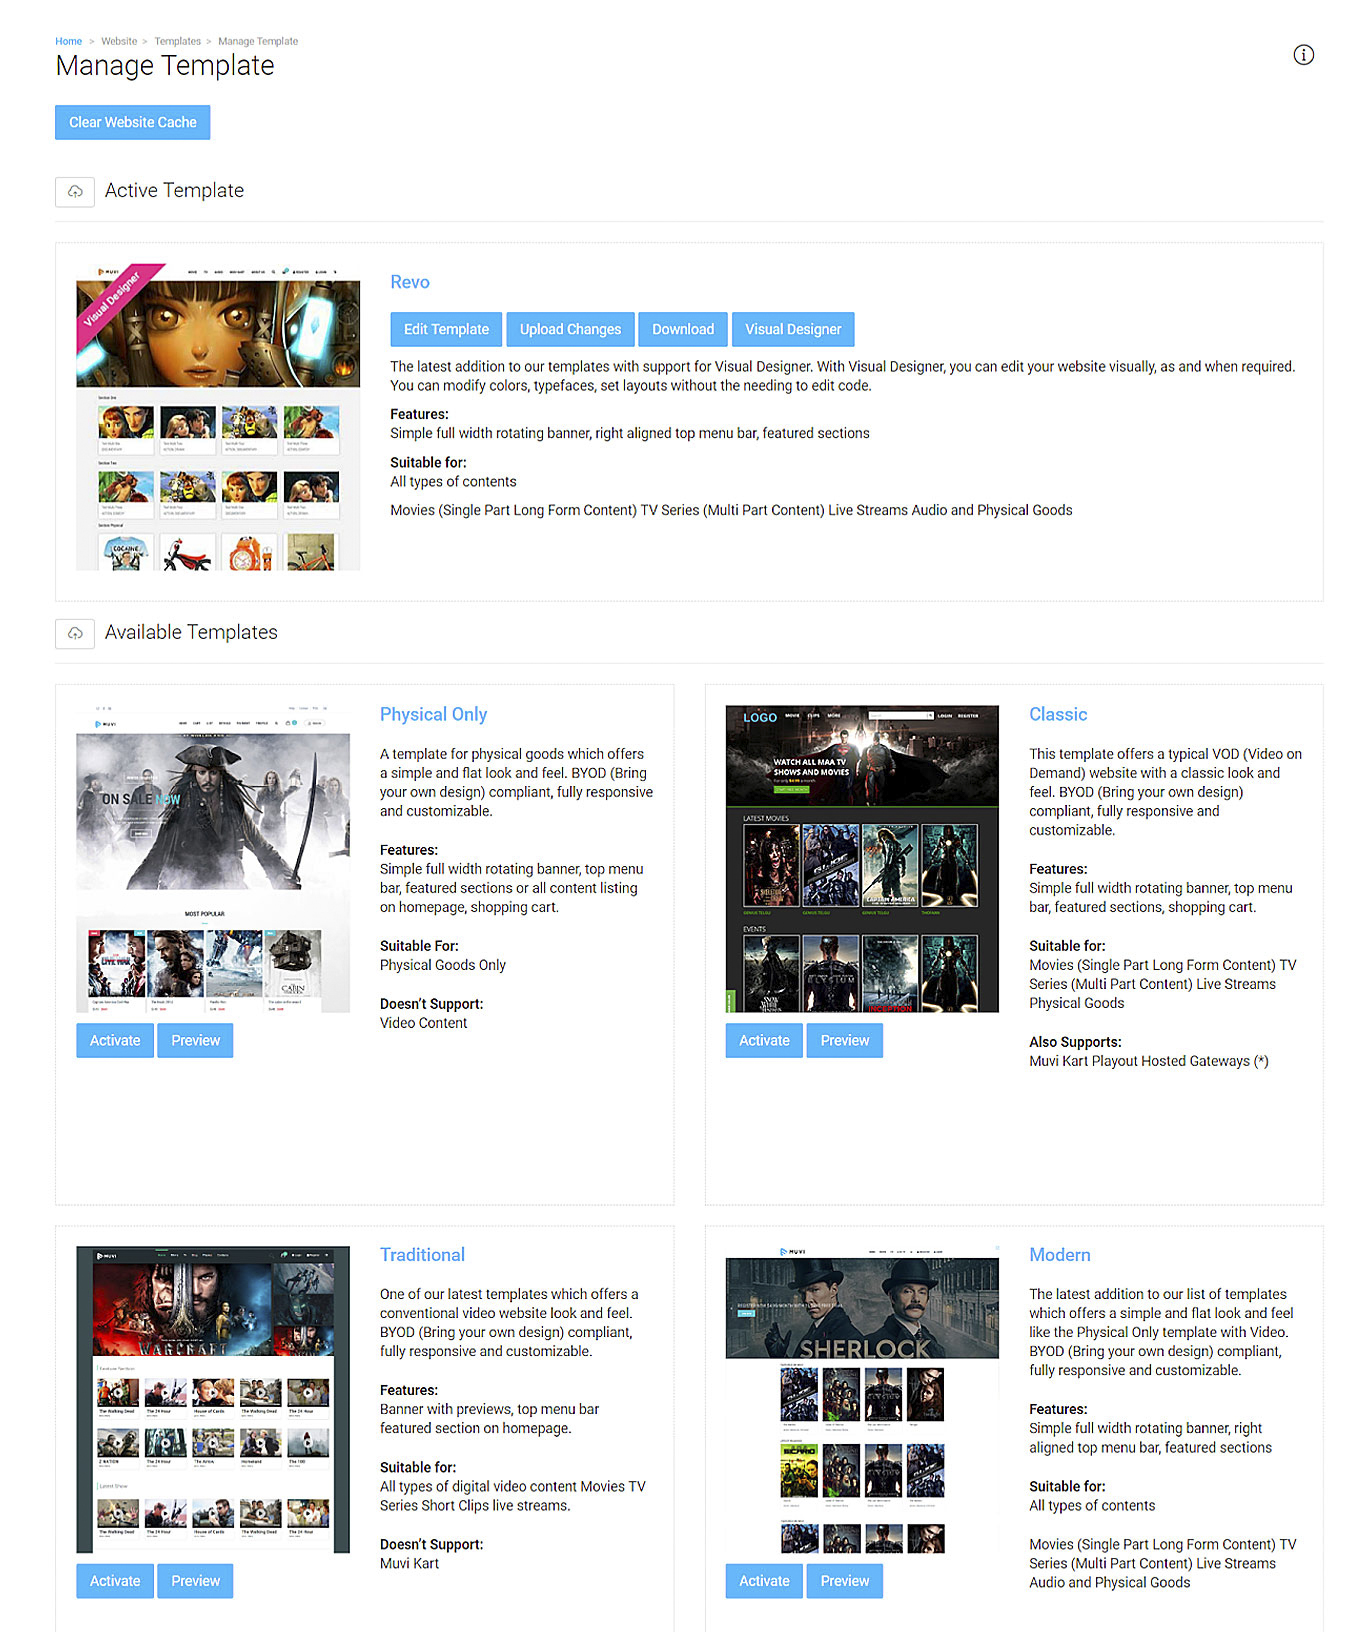
You will notice that our Revo template is activated, by default. However, you can change the template according to your taste. What’s cool is, after selecting the template, you can preview it. Only if it suits your aesthetic senses, you can go ahead and use the same for your video streaming website or go back and make iterations. After you have chosen the template, you can add your logo, images, titles, etc to match your brand persona.
5. Generate Embed Link
The next step is embedding your live stream on your website. Embed output URL (iFrame) is generated when you start the live streaming on our platform. To get started, you have to navigate to the admin dashboard or CMS. Click on “Embed” to get the URL. You can embed it into your live streaming website to get the live stream output.
6. Monetize your Live Streams
If you are looking to sell videos online from your live streaming platform, you need to create easier processes for people to pay you. This is exactly why it is a good idea to offer multiple monetization methods. If you can accept Stripe, credit cards or PayPal, you are already off to a good start!
Just go to “Monetization” –> “Settings” and select the checkboxes for different monetization plans under “Monetization Model” and click on “Update”. That’s it! Your stunning video streaming website is now ready to go live!
7. Go Live!
All the above-mentioned steps can be executed in less than an hour and your dream of launching a live streaming website will come true.
Wrapping Up,
We are hopeful that you have got a fair understanding of building your live streaming website. If you are planning to launch a multi-device supporting, customizable live streaming app along with your website, but still on the fence deciding which video streaming service provider should you choose, we would urge you to consider Muvi!
Our end-to-end, fully-featured OTT solution will surely check all your boxes and turn your live streaming dream into a reality.
We’d love to set you up for a 14-Day Free Trial to take advantage of our feature-rich OTT platform!


Add your comment