The market for broadcast and live streaming meetings is going to hit $252.76 billion by 2029. Around 23% of the global video watch time consists of live streams. So if you are still not livestreaming just out of fear of … Continue reading →
The market for broadcast and live streaming meetings is going to hit $252.76 billion by 2029. Around 23% of the global video watch time consists of live streams. So if you are still not livestreaming just out of fear of failure, you are losing out on this big opportunity!
It’s obviously not easy to master live video streaming for anyone without the right tools and setup. You need to be well aware of the right live streaming services provider equipment, setup, best practices, and everything else. It needs time, practice, and guidance! We understand that. That’s why we are here to guide you through it!
Starting your own live streaming business will involve the following steps:
Choose Your Equipment: First comes the equipment – camera, tripod, microphones, lights! You need to choose the right equipment that is affordable, easy to set up and use, and matches your exact needs.
Choose Your Platform: There are just too many live streaming platforms, so you are bound to get confused! We will tell you how to Choose the right live streaming platform — for example, a reliable church live streaming provider — to reach your audience effectively and that helps you earn maximum live stream revenues with minimum technical setup.
Live Streaming Setup: Once you have both the equipment and platform, you need to set up your live stream. It involves scheduling, adding details, and generating a stream link for your event live streaming.To streamline recurring broadcasts and avoid manual setup for each event, use a video scheduler to queue broadcasts, manage start times across timezones, and auto-publish recordings to your VOD library.
Go Live: Take a deep breath, revise your script for one final time, and go live!
In this blog, we will take you through all these steps in detail one by one. At the end, we will also share some pro tips and live streaming best practices. So, let’s get started!
How To Choose The Perfect Live Streaming Equipment
Before choosing the equipment, here’s a question for you to ponder. What makes live streaming equipment “perfect” for you? Is it the cost, efficiency, longevity, or ease of use? Or do you have any specific use case like game live streaming, outdoor live streaming while traveling, or the need to live stream funerals .
If you can figure out the answer to these questions, choosing the perfect equipment and comparing the best live audio streaming platforms will be easier for you! If you plan to run continuous programming (multiple shows or channels) rather than one-off streams, consider using an online tv channel maker — it simplifies scheduling, multi-channel playout, and centralized monetization so you can focus on content instead of ops.
We already have a detailed blog on budget-friendly live streaming equipment, if that’s what you are looking for. Still, we will tell you a bit more about the most important live streaming equipment like camera, tripod, microphone, lights, capture cards, and audio mixers. Let’s start with the camera.
Camera
Nowadays, live streamers are more inclined towards using a professional live streaming mobile app on their phones.Even if you want to deliver pro-level visuals to your audience, pairing a professional camera setup with the best app for live streaming can streamline your entire workflow.
The choice of a good camera depends on many factors. If you want high-quality visuals, your camera must support high resolution. Full HD is a bare minimum, while 4K is often desired. You should also consider frame rate and field of view.
Field of View: Adjustable with interchangeable lenses
Superior image quality with excellent low-light performance. Highly customizable with interchangeable lenses. Very high frame rates for super smooth slow motion
Larger and heavier than webcams. Requires separate capture card for PC use. A bit expensive.
Once you have a camera, you will need a suitable tripod to hold it in place. Tripods are important because they act as your camera stand, and you can move around a bit while live streaming without the need to carry your camera in your hands.
While choosing the right tripod, you should consider the following aspects:
Camera Weight: Your tripod MUST be able to support the weight of your chosen camera. Otherwise, there’s simply no point in using it!
Height: Consider the height you need for your streaming setup. If you plan to stand while streaming, you’ll need a taller tripod.
Portability: If you travel often for your streams, a lightweight and portable tripod is essential.
Head Type: Tripods come with two types of heads: Fluid head and Ball head. Fluid head is great for smooth panning and tilting movements. While ball head is more versatile for quick adjustments to different angles.
Stability: A sturdy tripod is crucial for preventing camera shaking during live streams.
Here are some good tripods for live streaming:
Tripod Name
Specifications
Pros
Cons
Pricing
Manfrotto BeFree Live
Material: Aluminum.
Max Height: 59.45″ (151 cm)
Head: Fluid head with pan and tilt controls.
Lightweight and portable. Fluid head for smooth camera movements. Supports DSLR/mirrorless cameras up to 8.8 lbs (4 kg).
Limited height for standing positions.
US $214.95
JOBY GorillaPod 3K
Build Quality: Flexible legs with rubberized grips.
Max Height: 30.5 cm
Head: Ball head with 360° panning and tilt
Ultra-versatile with flexible legs for unique positioning. Compact and lightweight for travel. Supports cameras up to 6.6 lbs (3 kg).
Less stable than traditional tripods. May not be ideal for heavy cameras or windy conditions. Ideal to be placed above a table.
Head: 3-way pan/tilt fluid head for smooth movements
Excellent height range for various setups. Fluid head provides smooth panning and tilting. Affordable price point. Supports heavier cameras, up to 33 lbs (15 kg)
Slightly heavier than some travel tripods. May not be as compact as some folded options.
Whether you are broadcasting video or building an audience through an audio live streaming app, the quality of your live stream heavily depends on your mic quality. While choosing a good microphone for your live stream, you must consider factors like connection methods, budget, polar patterns, frequency response, etc. We already have a detailed blog on the Best Microphones For Live Streaming where we have elaborated on each one of them. So do check that out.
Here are some of the good microphones that you can use for your live streams:
Connection: USB Polar Pattern: Cardioid, Bidirectional, Omnidirectional, Stereo
Sample Rate: 48 kHz
Excellent audio quality for the price. Easy to use with a USB connection. Multiple pickup patterns and voice filters. Built-in headphone jack for monitoring.
It can pick up some background noise. Lacks some advanced features of higher-end microphones.
If you are planning to live stream indoors or at night, lighting will play a huge role. So, you must choose your lights carefully. Some of the factors to consider include:
Light Output: You must analyze the size of your streaming space. It will help you decide how much light you need. And then choose a light accordingly. Panel lights offer stronger output, while light bars are more suited for smaller areas.
Color Temperature: Decide if you need warm light, daylight, cool daylight, or adjustable lights. If you ask me, adjustable lights are best as it helps you adjust the lighting based on your mood or need.
Mounting: Think about how you want to position your light. Magnetic options and desk clamps offer flexibility, while some lights require separate stands.
Portability: If you travel for streaming, a compact and lightweight light might be necessary.
Here are some of the lights you can use for live streaming:
Compact and portable. Adjustable color temperature for various environments. Easy to mount with magnetic option. Dims flicker-free for comfortable viewing.
The light output might not be enough for large spaces.
Powerful LED output for well-lit streams. Wide color temperature range for creative control. Battery-powered option for mobile setups. Built-in diffusion filter softens the light.
Larger in size compared to some on-camera lights. Requires separate purchase for AC power adapter.
Versatile design with bendable arm. Adjustable color temperature and brightness. Compact and easy to transport. Works with Bluetooth or USB connection.
Light output is weaker compared to panel lights. May not be ideal for larger setups.
US $149.99
Some Additional Equipment
There are some additional live-streaming tools that are not compulsory, but they sometimes become necessary, especially if you are managing complex hls streams. Capture card and audio mixer are two such tools. So, let’s take a brief look at them.
Capture Card
You would sometimes want to capture video and audio feed from an external device via a capture card. There are different types of capture cards in the market, depending on specific use cases. Like if you are live streaming a game or an e-sports tournament, you might want to use Elgato Game Capture HD60 X.
But if you are live-streaming normal day-to-day events or conversations, you will not need that. In that case, you might use something like NZXT Signal HD60 which is an affordable option.
Audio Mixer
Just like a capture card, an audio mixer is also purely optional. There will be certain live streams where you will be tempted to use multiple microphones or audio sources. An audio mixer will be immensely beneficial in such situations. Otherwise, you might not need it.
Behringer Xenyx X1204 USB is a good budget-friendly audio mixer you can use. However, for professional quality audio and studio-like sound, you can use Mackie ProFX16v3.
Which is The Best Live Streaming Platform for You?
Just like the equipment, choosing a good live streaming platform also depends on the features you would need. So, before proceeding further, let’s take a look at the top features of a good live streaming platform.
?Top Features of Live Streaming Platforms
Here are some of the top features that every live-streaming platform must have:
Monetization: You give a lot of hard work and effort to each of your live streams. So, you deserve to earn good revenues from them. A reliable live streaming provider must allow you to insert ads and paywalls into your livestream so that you can generate revenue via advertising and pay-per-view.
Multi-DRM: Imagine you are live broadcasting a conference, and someone in your audience starts recording it. They can then reuse it for any purpose. To prevent that, you should use platforms that offer multi-DRM security. Multi-DRM does not allow anyone to take screenshots or screen recordings. Also, it restricts unauthorized access.
Ease of Use: The best live-streaming platforms are extremely easy to use and require zero technical knowledge. Even a non-techie can use them very easily.
Scalability: Whether you are live streaming to 10 viewers to a billion viewers, it does not and should not matter.
Stability: Would you like to watch a live stream with lots of buffering? No, right? So, a good live streaming platform must ensure Low Latency Live Streaming and zero buffering.
DVR-Enable Live Stream: DVR lets your audience pause, rewind, and replay the live content as per their convenience.
Live Chat: Live chat is a major weapon for fan engagement. Your viewers can express their views, react to other people’s views, and most importantly give feedback on your live streams.
Monetizing Live Streams
Monetization is probably the most important thing to consider for any live streamer. Different live-streaming platforms offer different tools for monetizing your live streams. But if your primary focus is generating more revenues, then you should never depend only on ads.
This is because ads will pay you money only when they are fully watched. If someone skips the ads without watching it for more than 15 seconds or uses ad blockers, you won’t get revenues from such viewers.
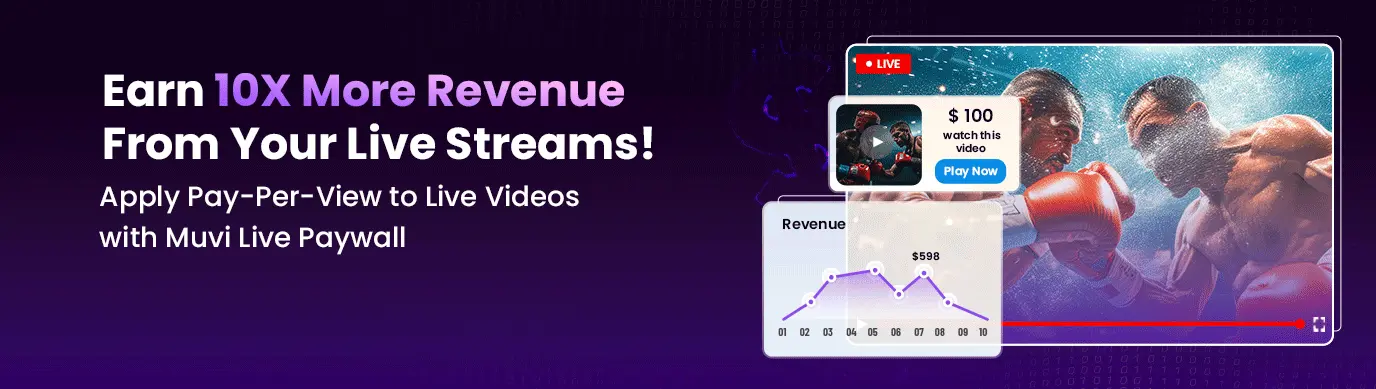
This is where the use of Paywall becomes crucial. Using Paywall, you will ask your viewers to pay a specific sum of money in order to access the live streams. Hence, it will help you monetize 100% of your viewership.
And, it will help you increase your revenues by many folds. In fact, there are enough numbers to prove that you can generate 10x more revenues and get 16x more money than YouTube using Muvi Live Paywall. Click here to know how, or watch this video ?
✨The Best Platforms for Scalable, Secure, Profitable Live Streams
The key features of all these 5 live-streaming platforms have been compared in the table given below.
Feature
Muvi Live
Vimeo Livestream
Dacast
Brightcove
Uscreen
Scalability
Scales to a large audience, has built-in CDN
Scales to large audiences
Scales to large audiences
Scales to large audiences
Scales to medium audiences
Security
Secured with built-in Multi-DRM and watermarking
Secured with standard streaming protocols
Secured with AES-128 encryption
Secured with DRM and SOC 2 compliance
Secured with video encryption
Monetization
Pay-per-view, ad-insertion
Not enough monetization support
Pay-per-view, Ads
Ad Insertion
Pay-per-view
Cost
Start FREE, Pay As You Go, Keep 90% of your revenues
Starts at $65/month
Starts at $39/month
Starts at $199/month (custom quotes for enterprise)
Starts at $199/month
DVR
Available
Available
Available
Available
Available
Live Stream Recording
Included
Included
Included
Included
Included
If you see the table carefully, you will realize that Muvi Live stands out in every feature and parameter listed above. Hence, it is by far the best Video Live Streaming platform in 2024, that helps you deliver scalable, secure, and profitable live streams.
So, in our next section let’s take a look at how you can setup your live stream very easily using Muvi Live.
Steps To Setup Your Live Streaming
You can set up your live stream very easily by following the steps given below:
Click here to sign up with Muvi Live. No upfront payment is required. You can start FREE, and then Pay As You Go.
Login to the Muvi Live dashboard.
Now you need to add a new live stream. Click on “Add a Live Stream” to do so.
The live streaming form will open next. Start filling out that form. Add a name, description, and other details about your livestream.
Choose a suitable source for your live feed. I am assuming that you will be using your own camera and microphone as sources. In addition to the camera and microphone, you can also take live feeds from any 3rd party encoders like vMix and OBS.
If you want to add a paywall for pay-per-view monetization, enable the paywall option. You will be asked to add a paywall fee and default currency. Fill that.
If you want to insert ads, enable ad insertion.
You can also personalize the player settings.
Once you have filled up all the necessary details, click on save.
Now come back to your live stream section where you will now see your newly added stream. Click on the three dots on its right.
There, you will get the option to share the live stream link. So, click on it to copy the live stream link, and share it with your viewers.
For a more detailed understanding of how to set up your livestream, click here.
Go Live!
This is the final step, and the most important one. Before going live, it is important to ensure that all your equipment is properly connected and working. Also, you should double-check your livestream setup.
Once you have all the equipment and setup in place, just calm yourself down a bit and click on the start live stream button.
Pro Tips – Live Streaming Best Practices
Just starting the livestream is not enough. In order to ensure a successful livestream with good audience engagement, following the livestream best practices is important. Here are some pro tips that will help you deliver quality livestreams:
Choose a theme or topic that aligns with the interests of your audience.
Have a loose outline or script prepared beforehand, to keep your stream focused and engaging.
Do a test run of your entire setup, including audio, video, lighting, and streaming software, to ensure everything works smoothly.
Use a wired ethernet connection whenever possible for a stable and reliable internet connection. If using Wi-Fi, ensure a strong signal to avoid lag or dropped frames.
Welcome viewers at your stream’s beginning and acknowledge their presence throughout the broadcast.
Interact with your audience by reading and responding to comments and questions in real time. This creates a more personal and engaging experience.
Enunciate clearly and avoid speaking too fast to ensure your audience understands you easily.
Modulate your voice and vary the pace of your speech to keep things interesting and relatable.
Conclude your stream gracefully by thanking viewers for joining and mentioning any upcoming content or announcements.
Promotion is a key tool to bring more audience to your live stream. And in 2024, 90% of the live streams are promoted using social media. Effective live stream promotion requires the following:
While creating the social media posts for promotion, craft clear, informative, and engaging titles and descriptions for your live stream. Highlight the topic, what viewers can expect, and why they should tune in.
Promote your live stream across all your social media platforms, including Twitter, Facebook, Instagram, etc. well in advance. Utilize relevant hashtags to reach a wider audience.
A few days before your live stream, start posting teasers or trailers with snippets of the content you’ll be covering.
Post about your live stream in relevant online communities or forums where your target audience gathers.
If you have an email list, send out an email to your subscribers to inform them about your upcoming live stream.
Apart from the above-mentioned promotion strategies, you can also follow community promotion techniques like:
Running polls or asking questions to generate interest and interaction.
Partner with other streamers in your niche for cross-promotion. Announce your upcoming stream on their channels and vice versa to tap into each other’s audiences.
To Sum Up
We hope the details shared in this blog will help you choose the right equipment, and the right live stream platform, and follow the right live stream setup and best practices.
If you are looking for a reliable live broadcast app android and Low Latency Streaming Solution that will help you generate hefty revenues, Muvi Live is the one for you! You can insert both paywalls and ads into your live streams, while your content remains secure using multi-DRM. Built-in CDN helps achieve amazing scalability and a larger number of concurrent viewers. And the best part is you do not need to pay any monthly subscription. So why wait? Sign up for FREE and start live streaming today!
FAQs
If you are looking for a live streaming platform that will help you earn a good amount of money from your live streams, then Muvi Live is definitely the perfect choice for you. It offers both paywall and ad-based monetization. Also, your content remains 100% secure and protected from piracy with multi-DRM.
Promote your live streams on social media.
Your social media posts must be engaging enough. You can initiate polls and ask about live-streaming topics.
You can also record short clips, teasers, and trailers and post them on social media.
Get all the necessary live stream equipment like camera, mic, and lights.
Choose a good live-streaming platform. Our personal favorite is Muvi Live.
Set up the live-streaming equipment.
Sign up with Muvi Live and set up a new live stream.
Set up an OBS or vMix stream, and connect the OBS or vMix stream with your Muvi Live stream.
The most basic live streaming setup includes:
Camera
Microphone
Lights
Live streaming platforms like Muvi Live
Encoding software like OBS
You will essentially need two types of software: Encoding software (for example – OBS, vMix, etc.) and a Live Streaming Platform (for example – Muvi Live).
Yes, for a stable live stream, internet speed of minimum 25Mbps is extremely necessary. It is often advised to go for an internet connection of 40Mbps or 72Mbps.
Debarpita is a Content Writer with Muvi. With around 2 years of experience in content creation, she has worked across industries like SaaS, EdTech, eLearning, AR-VR, and Metaverse. She believes in delivering content that can be of some value to the readers. In her free time, she likes to try her hand at website and app development.


Add your comment